1.DOWNLOAD
You can download LearnPress here.
2.LearnPress Settings
In this section, we will guide you to configure your LearnPress
3.Enable register option
You can enable or disable the register option in the login/account page by going to your Dashboard => Settings => General => Membership => Any one can register.
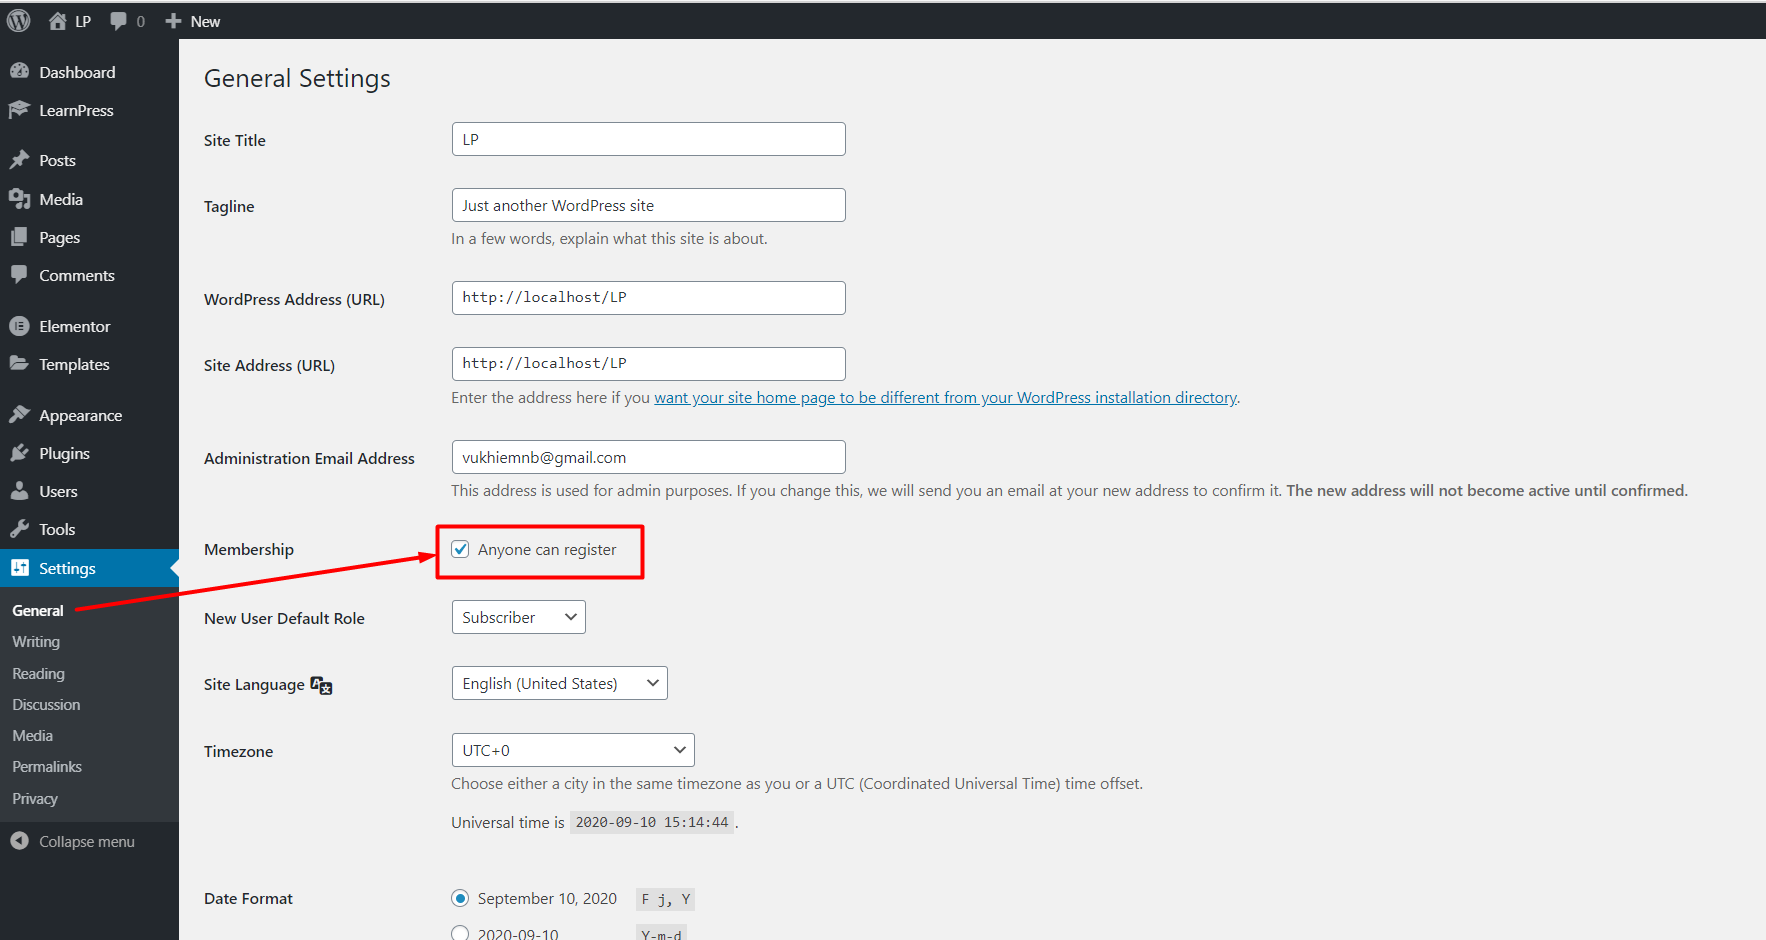
If you enable this option. Visitors can register on your website.
And if you disable this option. No one can create a new account on your website. Only you as an admin can create a new user in the backend.
4.Select the Homepage
You can choose which page will be your home page (the page visitors will see when they enter your main URL) in Dashboard => Settings => Reading => Your homepage displays => Home page, then select the page you want.
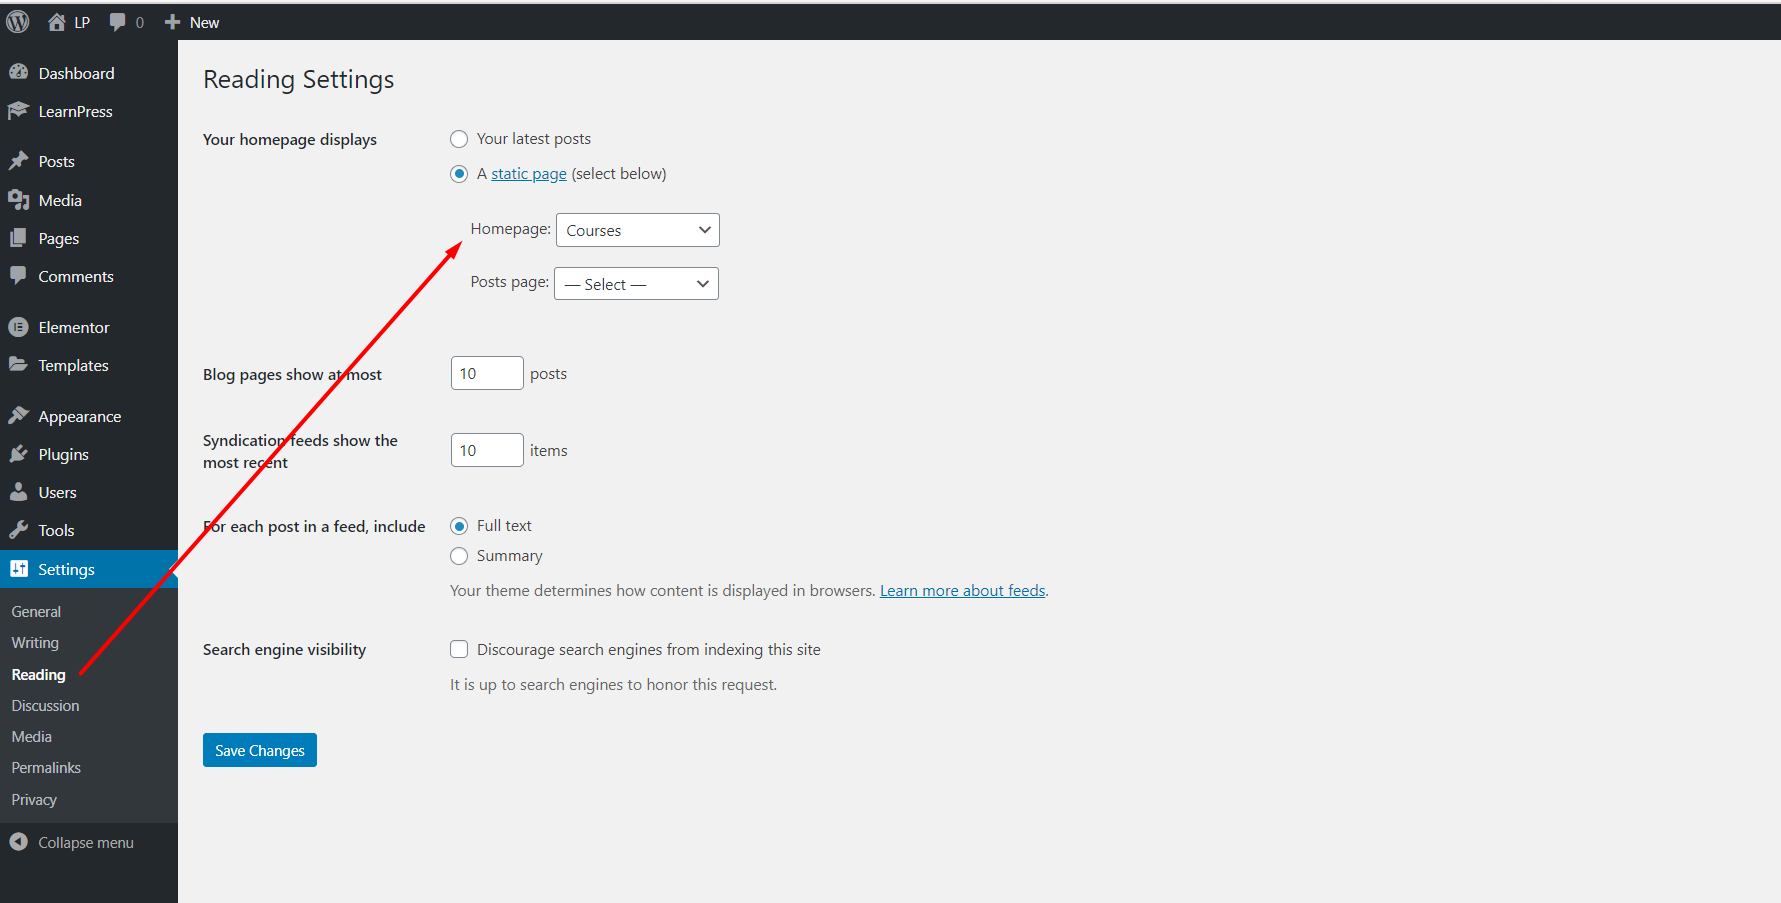
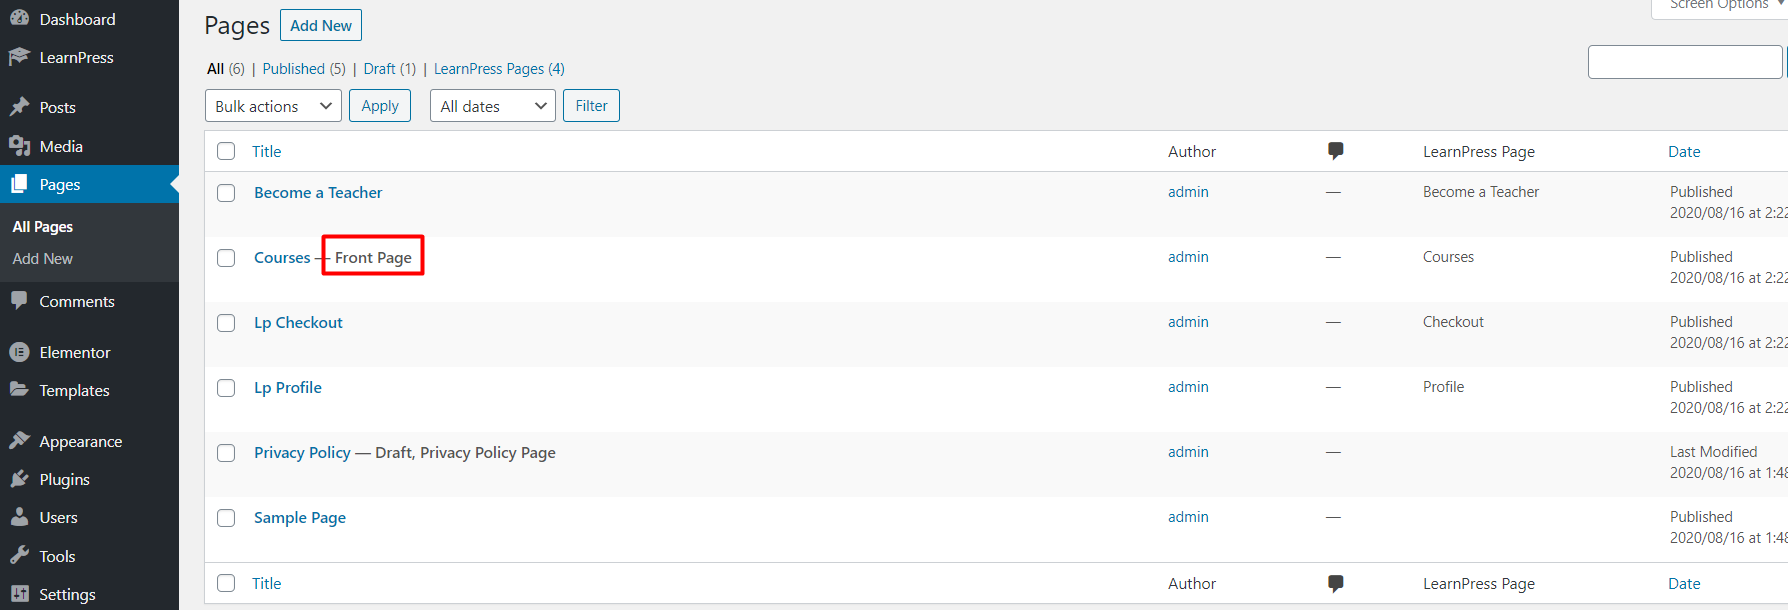
And the selected homepage will have this tag beside the name of that page:
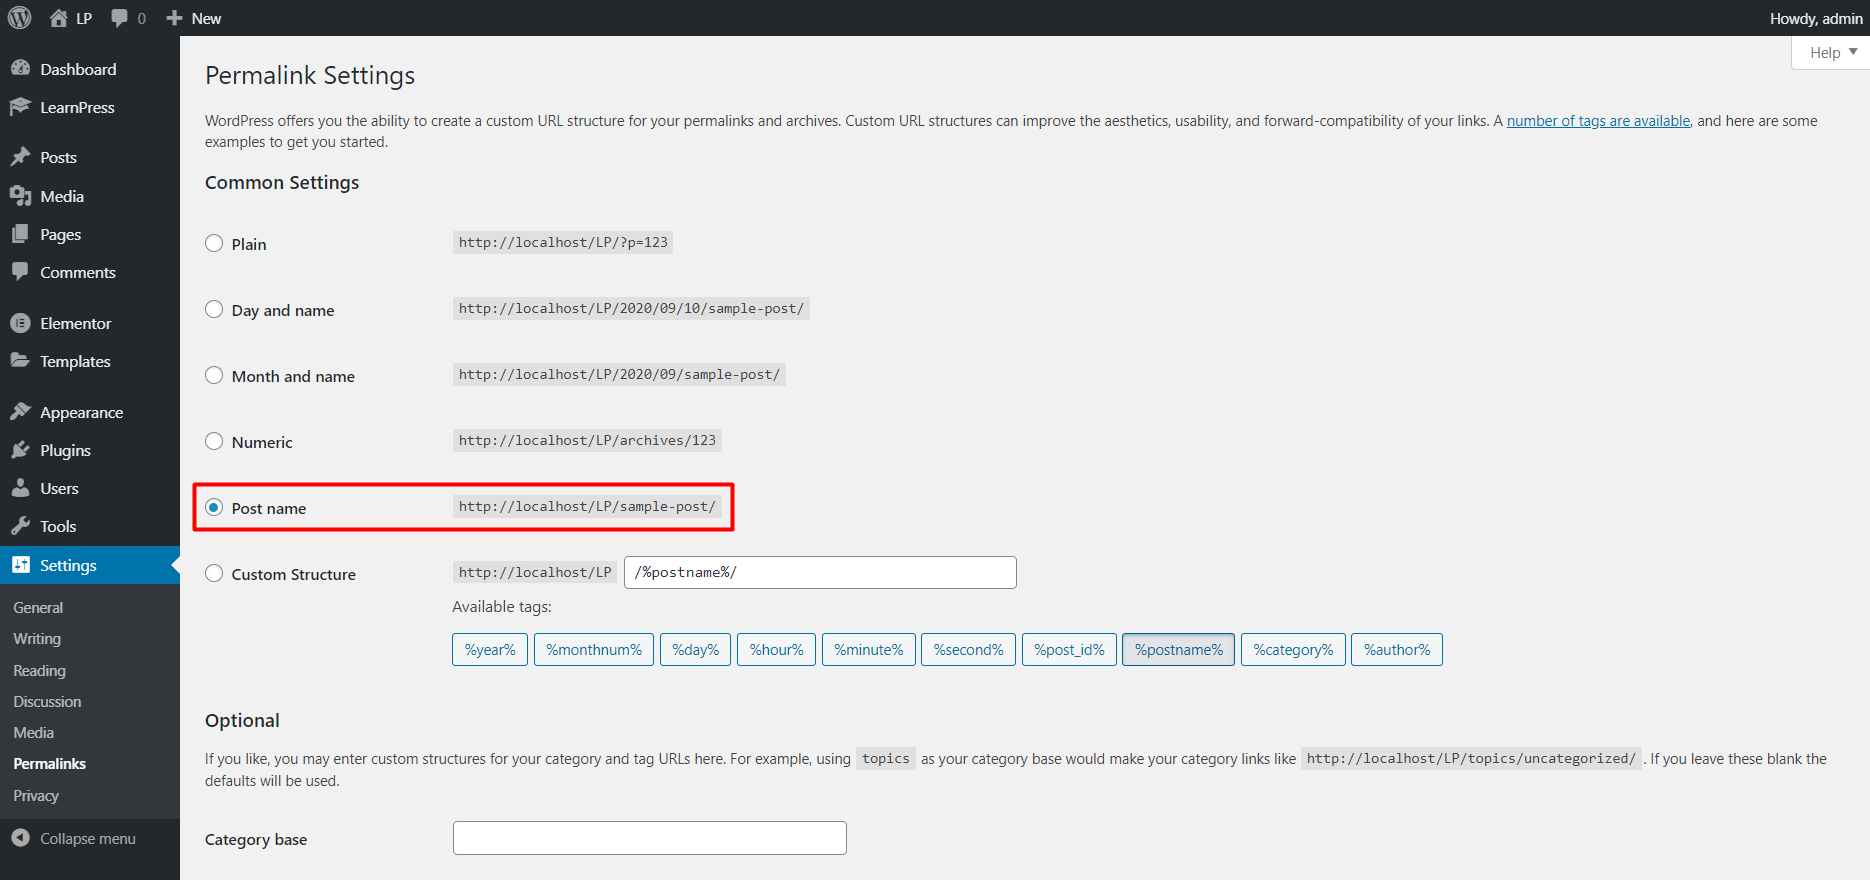
5.error when access lesson/quiz page
There are some reasons if you got a 404 error when access a lesson/quiz page. Below are two common reasons:
The first reason is setting the wrong permalinks. You should set your permalinks is Post name in Dashboard => Settings => Permalinks => choose Post name.
The second reason is that you didn’t publish that lesson/quiz/course.
If the 404 error reason is none of the above reasons. Please create a topic on our forum: LearnPress support forum. We will check your issue.
6.Logout redirect and Currency
You can set the page you want your users will be redirected after logout by going to your Dashboard => LearnPress => Settings => General => Logout redirect, choose the page you want.
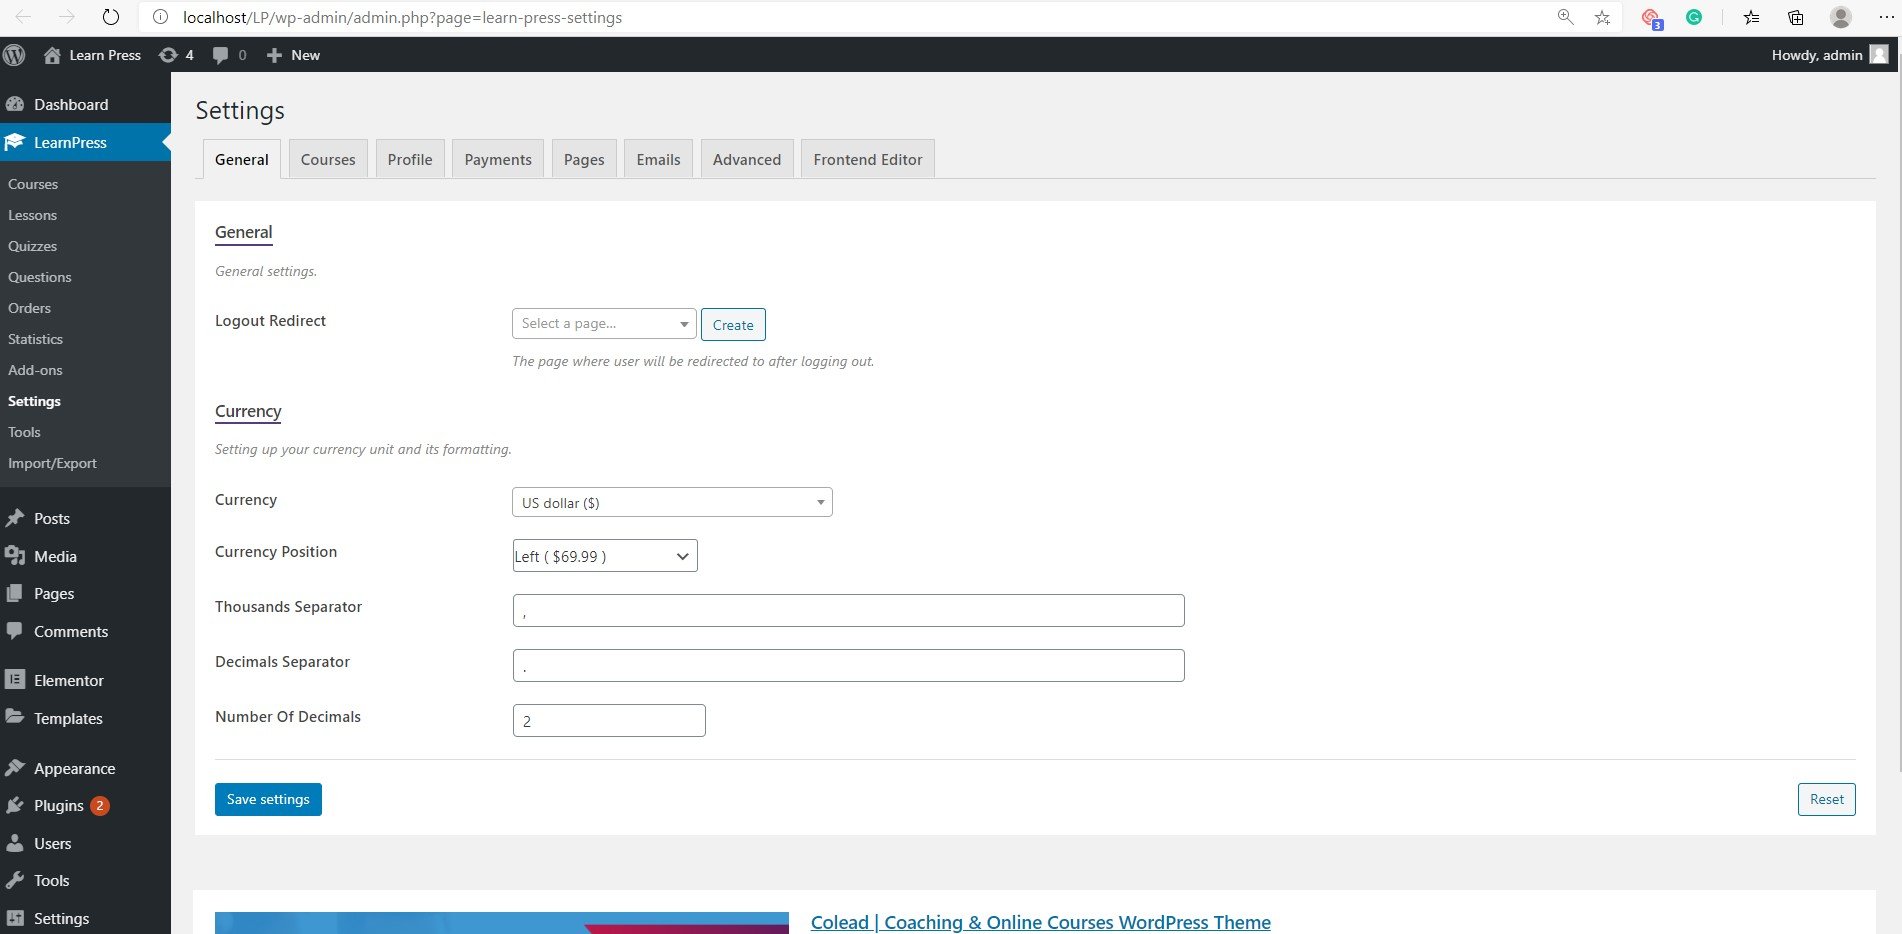
And you can set the currency displaying on your website in this section too.
7.Course review requirement
We have the option to require the admin review before publishing a course in Dashboard => LearnPress => Settings => Course => General
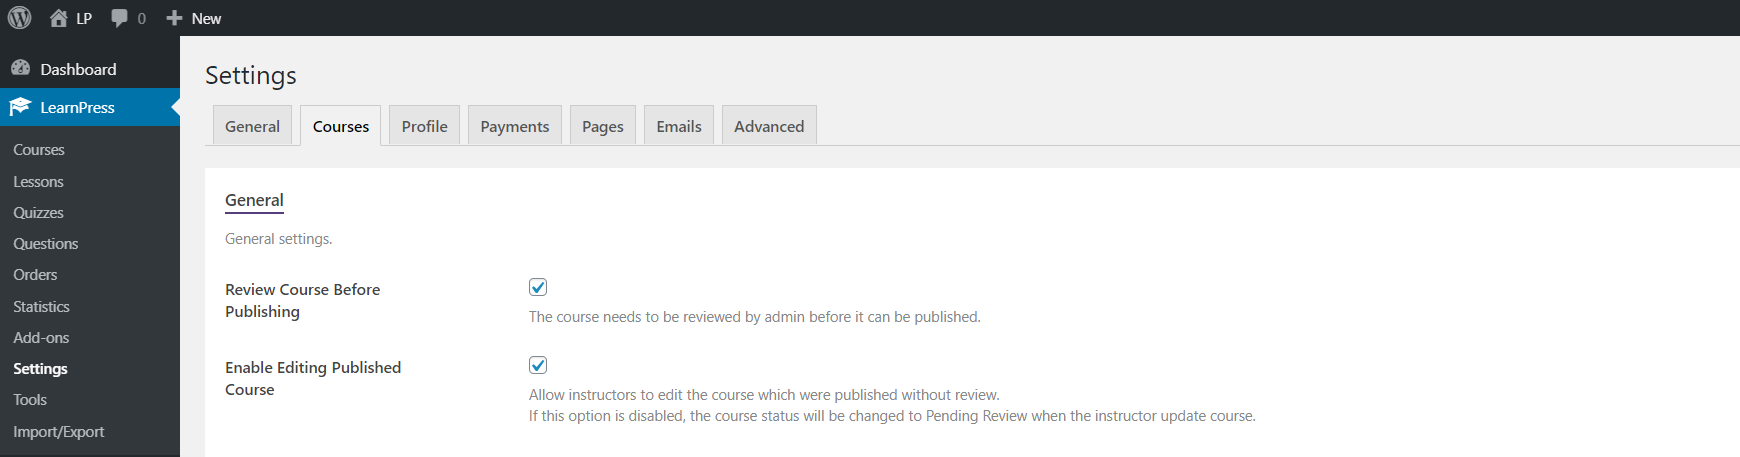
Review Course Before Publishing: The course needs to be reviewed by admin before it can be published.
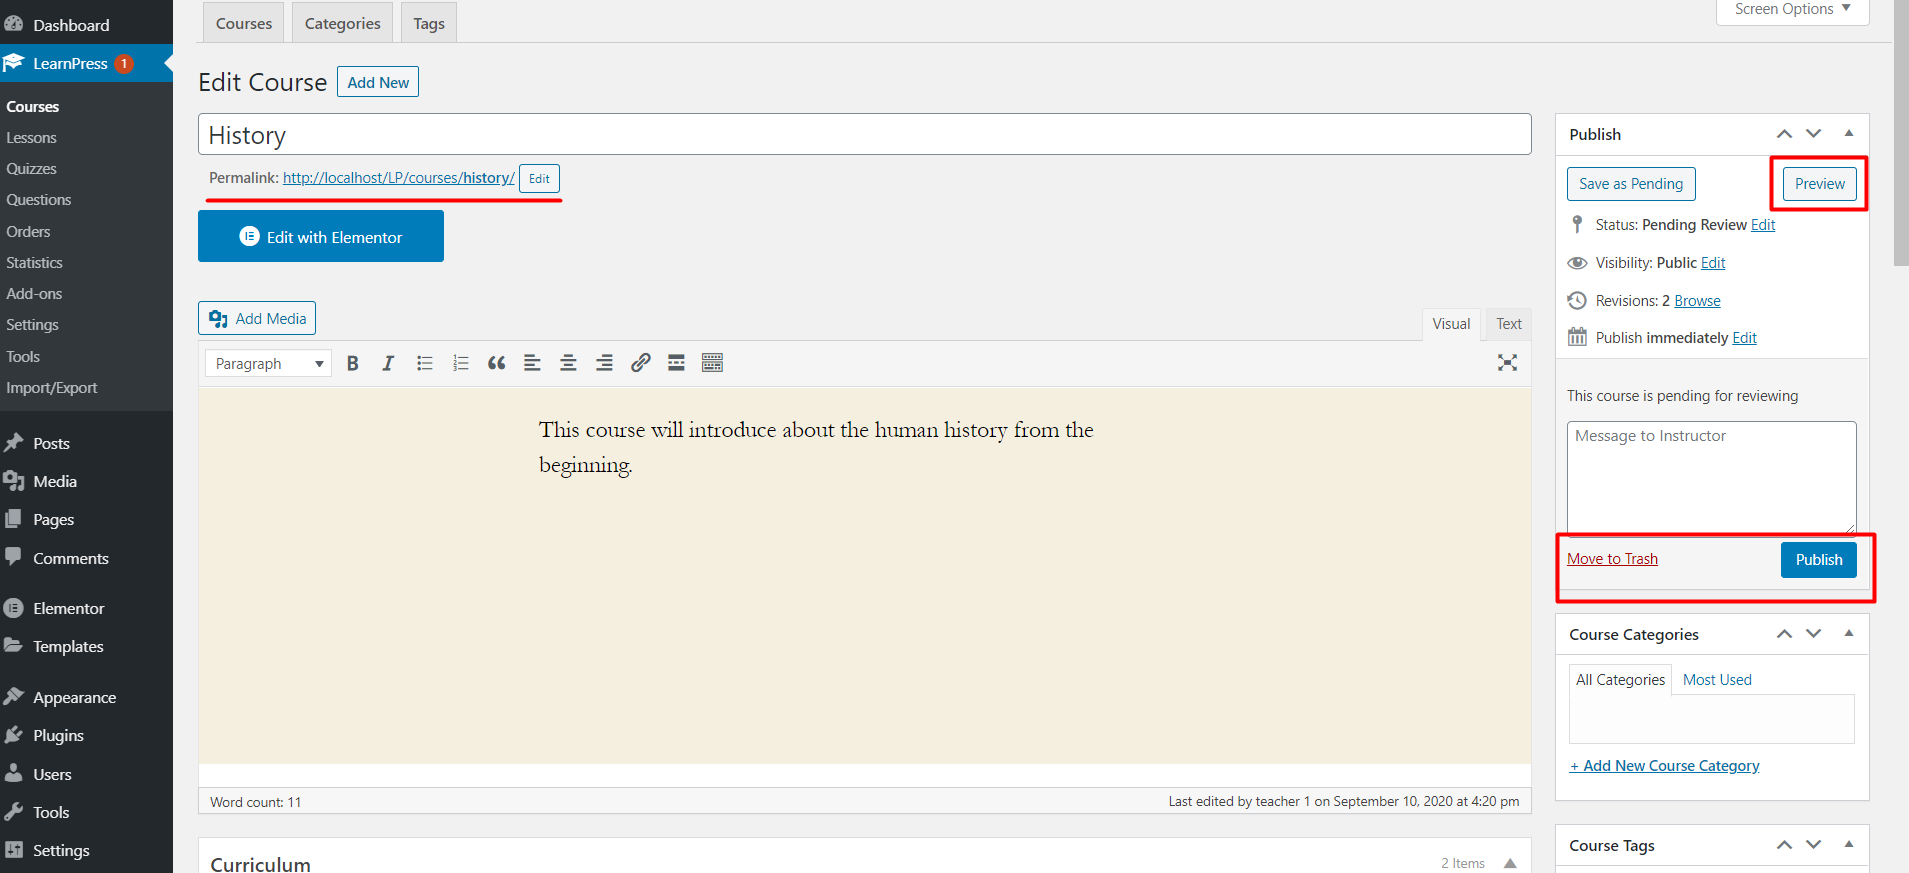
When a teacher submits a course for review, you will see a notice on LearnPress and that course in Pending status, as the below picture:

You can edit that submitted course, you are able to preview the course by click to the permalink of the course or click to the “Preview” button. As an admin, you have the right to publish or delete the submitted courses.
8.Course Thumbnails
This option is to set if you want to set all course thumbnails on the course page will display the same size or not.
You can enable it by going to your Dashboard => LearnPress => Settings => Courses => Course Thumbnails => Archive Course
If you disable this option, the course thumbnail in the course page will look like the below picture:
If you enable the Course Thumbnails option, all the course thumbnail will have the same size as below picture:
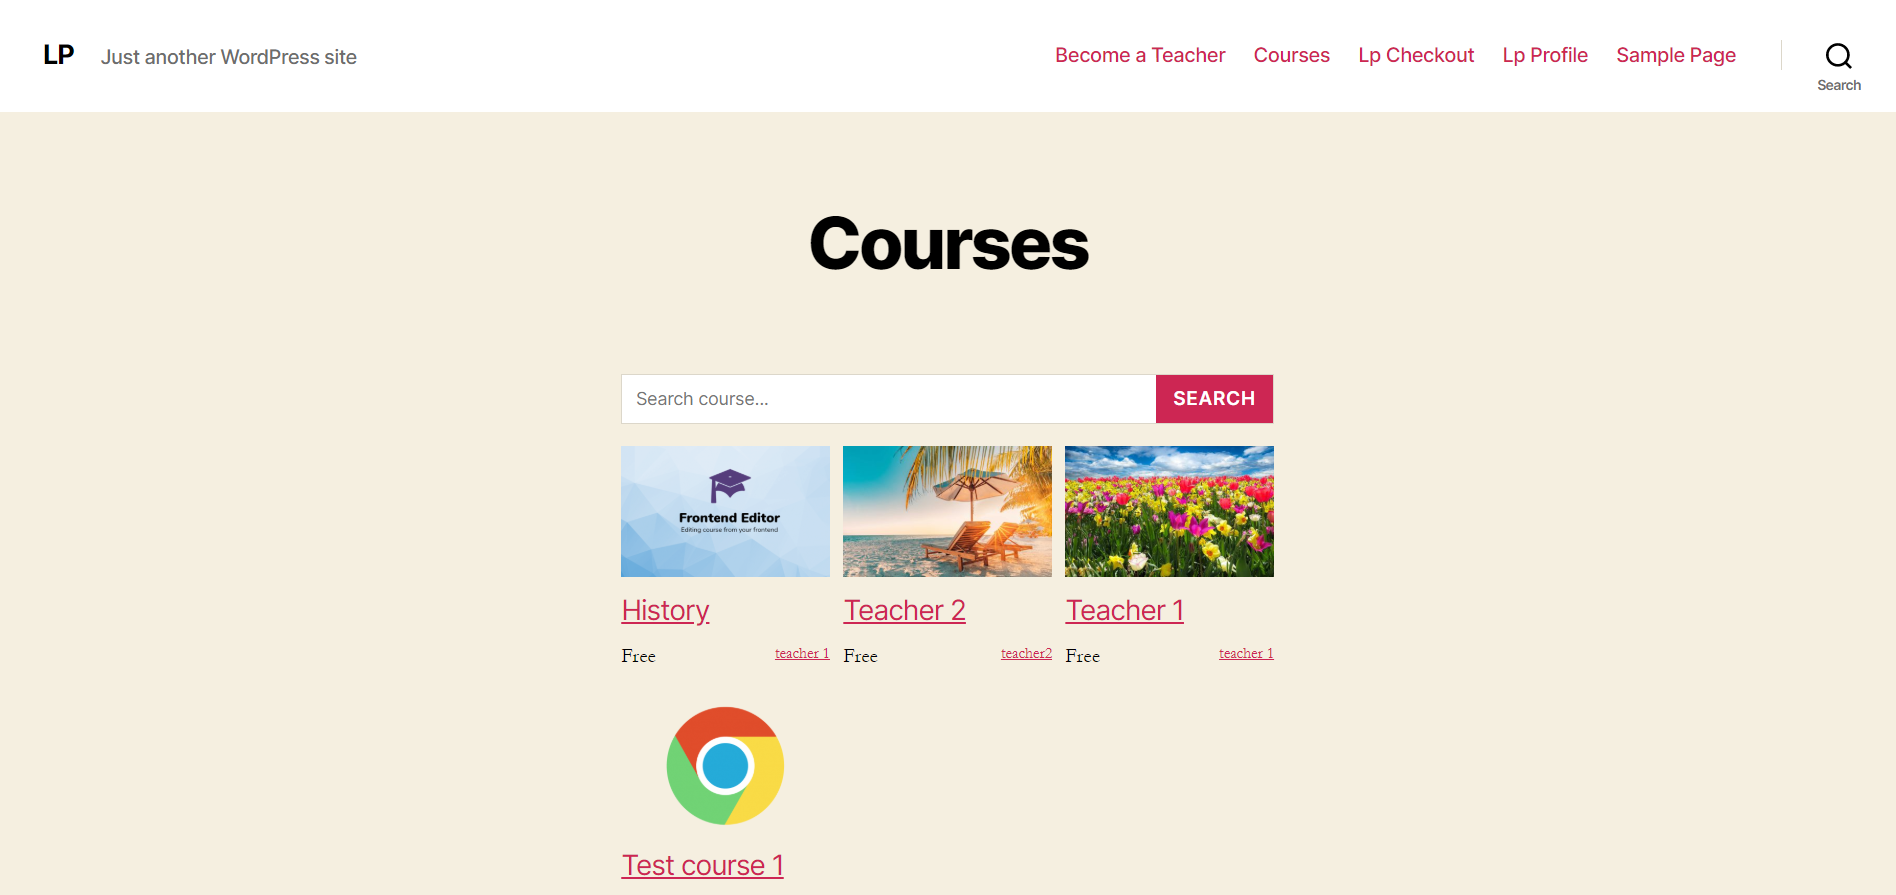
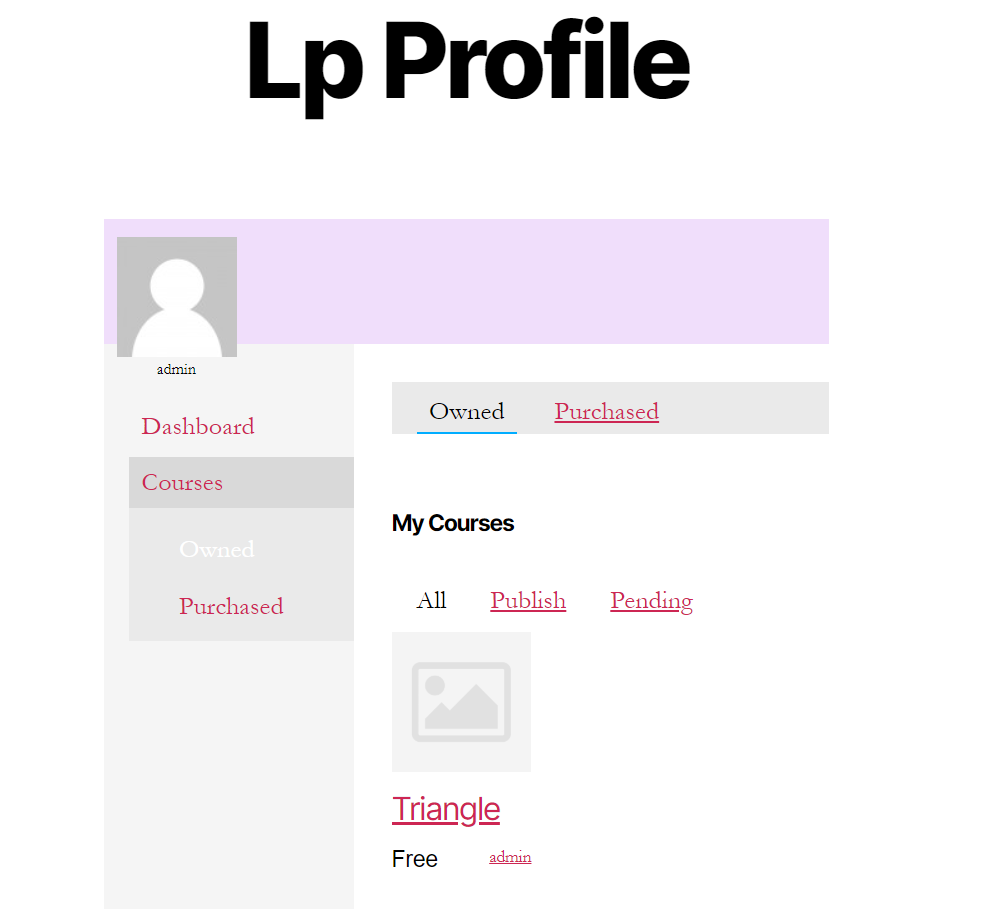
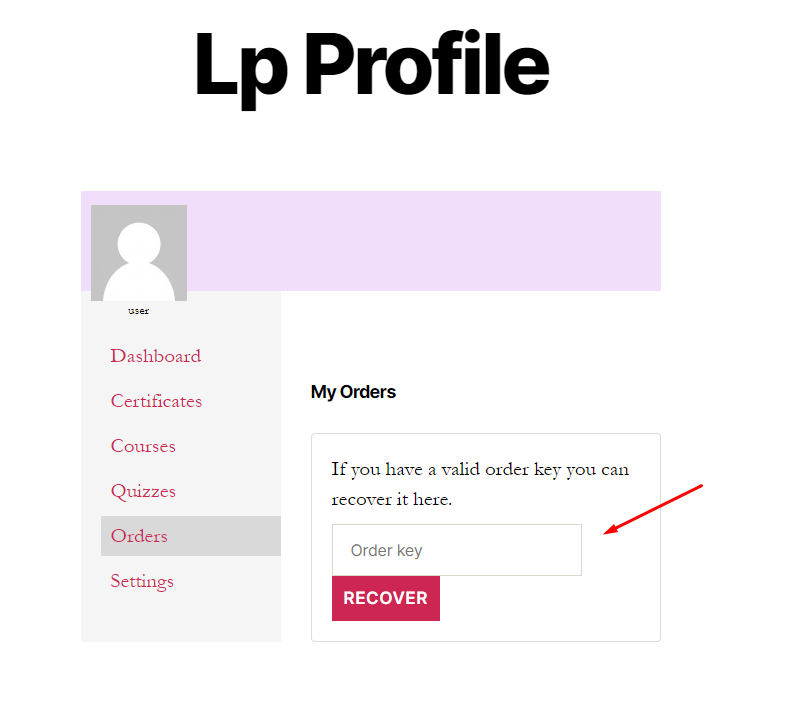
9.Profile
The default profile page of LearnPress is the lp-profile page (or profile page).
If you don’t have our lp-profile page, you can create a new page, then add our profile shortcode
[learn_press_profile]
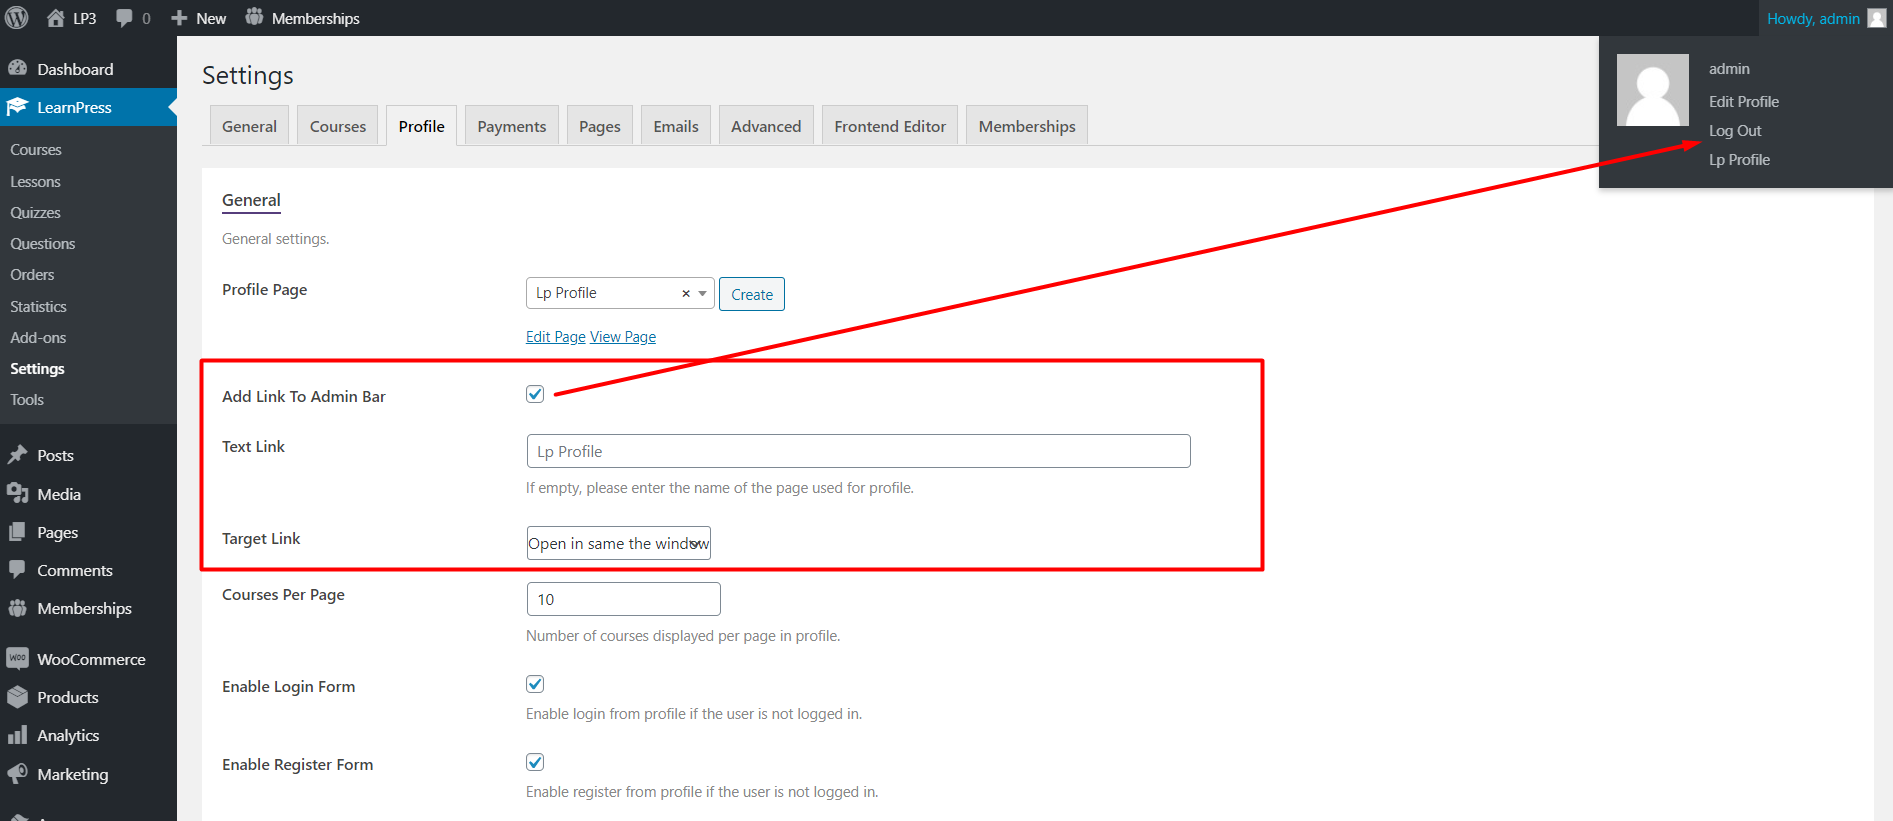
If you enable the “Add Link To Admin Bar” option, you can access the lp-profile page through the link on the admin bar.
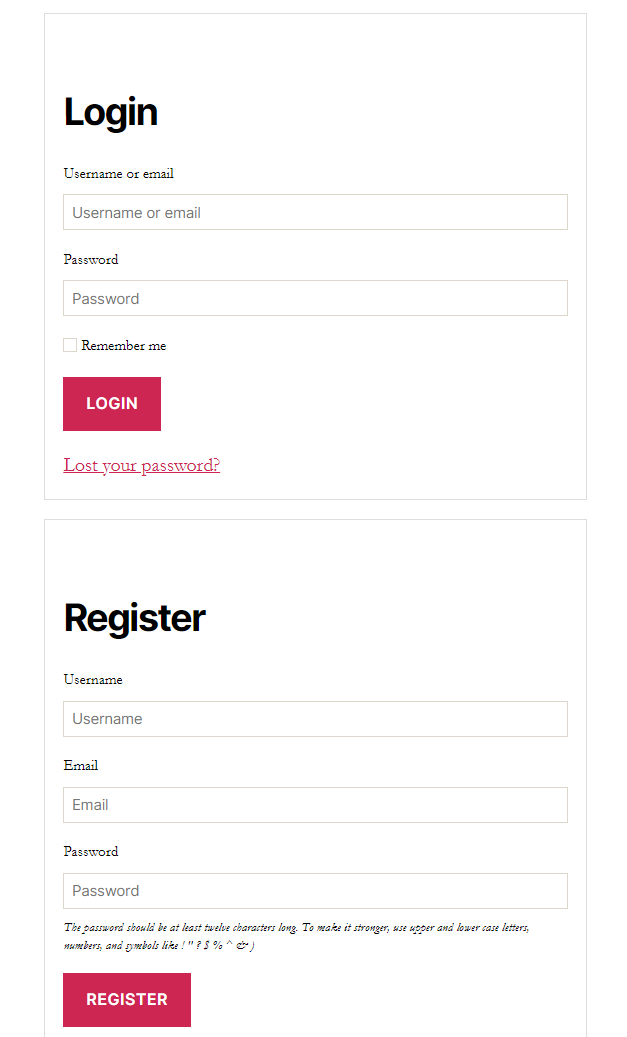
If you don’t enable “Enable Login Form” and “Enable Register Form” options, users will log in and register through the default login form from WordPress. If you enable those options, our login and register forms will display on the profile page.
Users are able to change their avatar if you enable the “Enable Custom Avatar” option and set the size of the avatar.
![]()
![]() When you enable the “Courses” option in Publicity. Students can see the courses of instructors or other students.
When you enable the “Courses” option in Publicity. Students can see the courses of instructors or other students.
10.Payment
The default checkout page of LearnPress is the “Lp-Checkout” page. If you don’t have that page, you can create a new page then add our checkout page shortcode:
[learn_press_checkout]
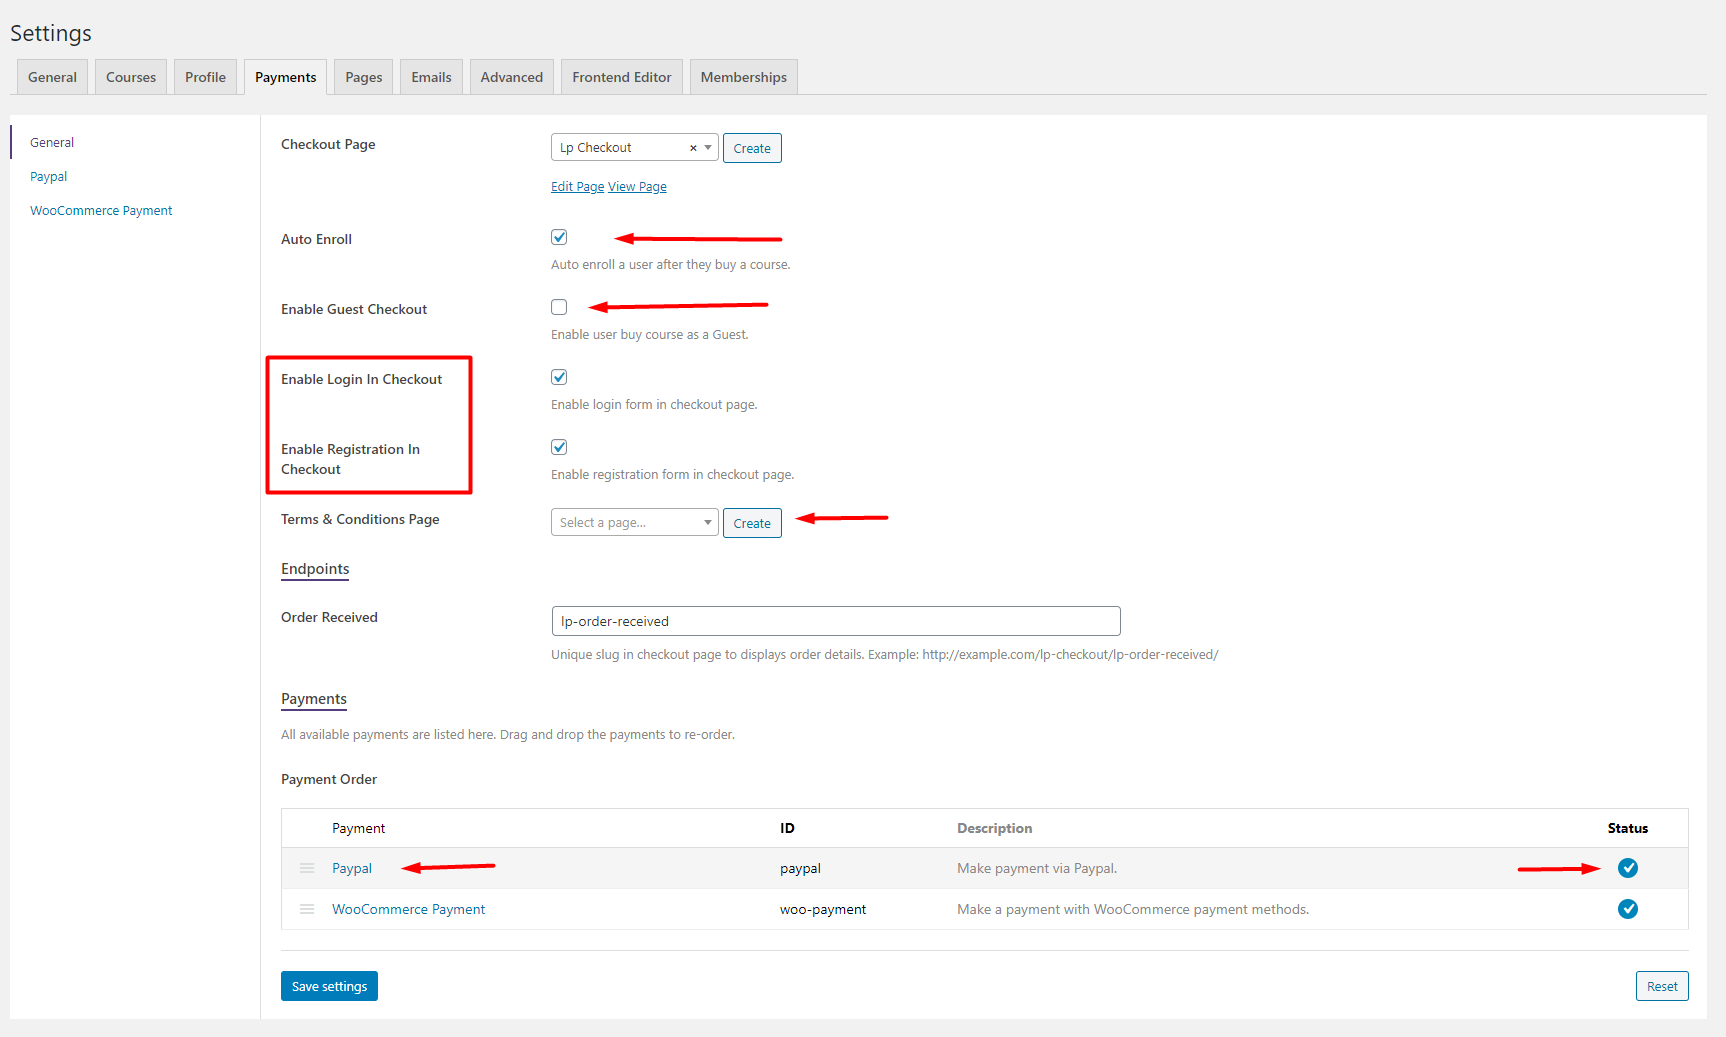
All your available payment methods will be displayed on the payment tab. You can activate or deactivate the payment method by click to the circle checkboxes in the “Status” column, and then click to the name of the payment method to configure it.
Paypal is the default payment method for LearnPress. If you want to use the payment methods which are supported by WooCommerce, you need to install our WooCommerce add-on for LearnPress.
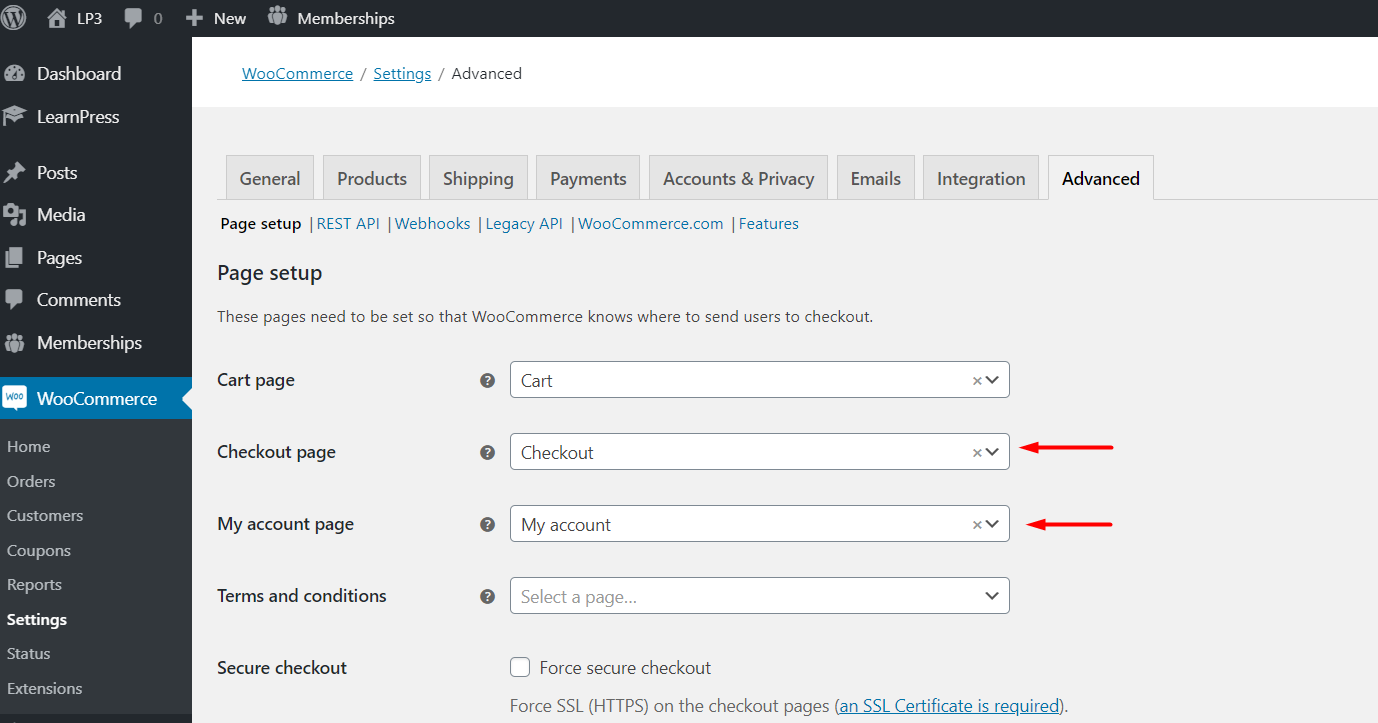
If you use our WooCommerce add-on for LearnPress, please choose the checkout page of LearnPress is the “Lp-Checkout” page, and the checkout page in WooCommerce is the “Checkout” page.
All your available WooCommerce payment methods will be displayed in LearnPress => Settings => Payment => WooCommerce. You can click on the payment method to configure it.
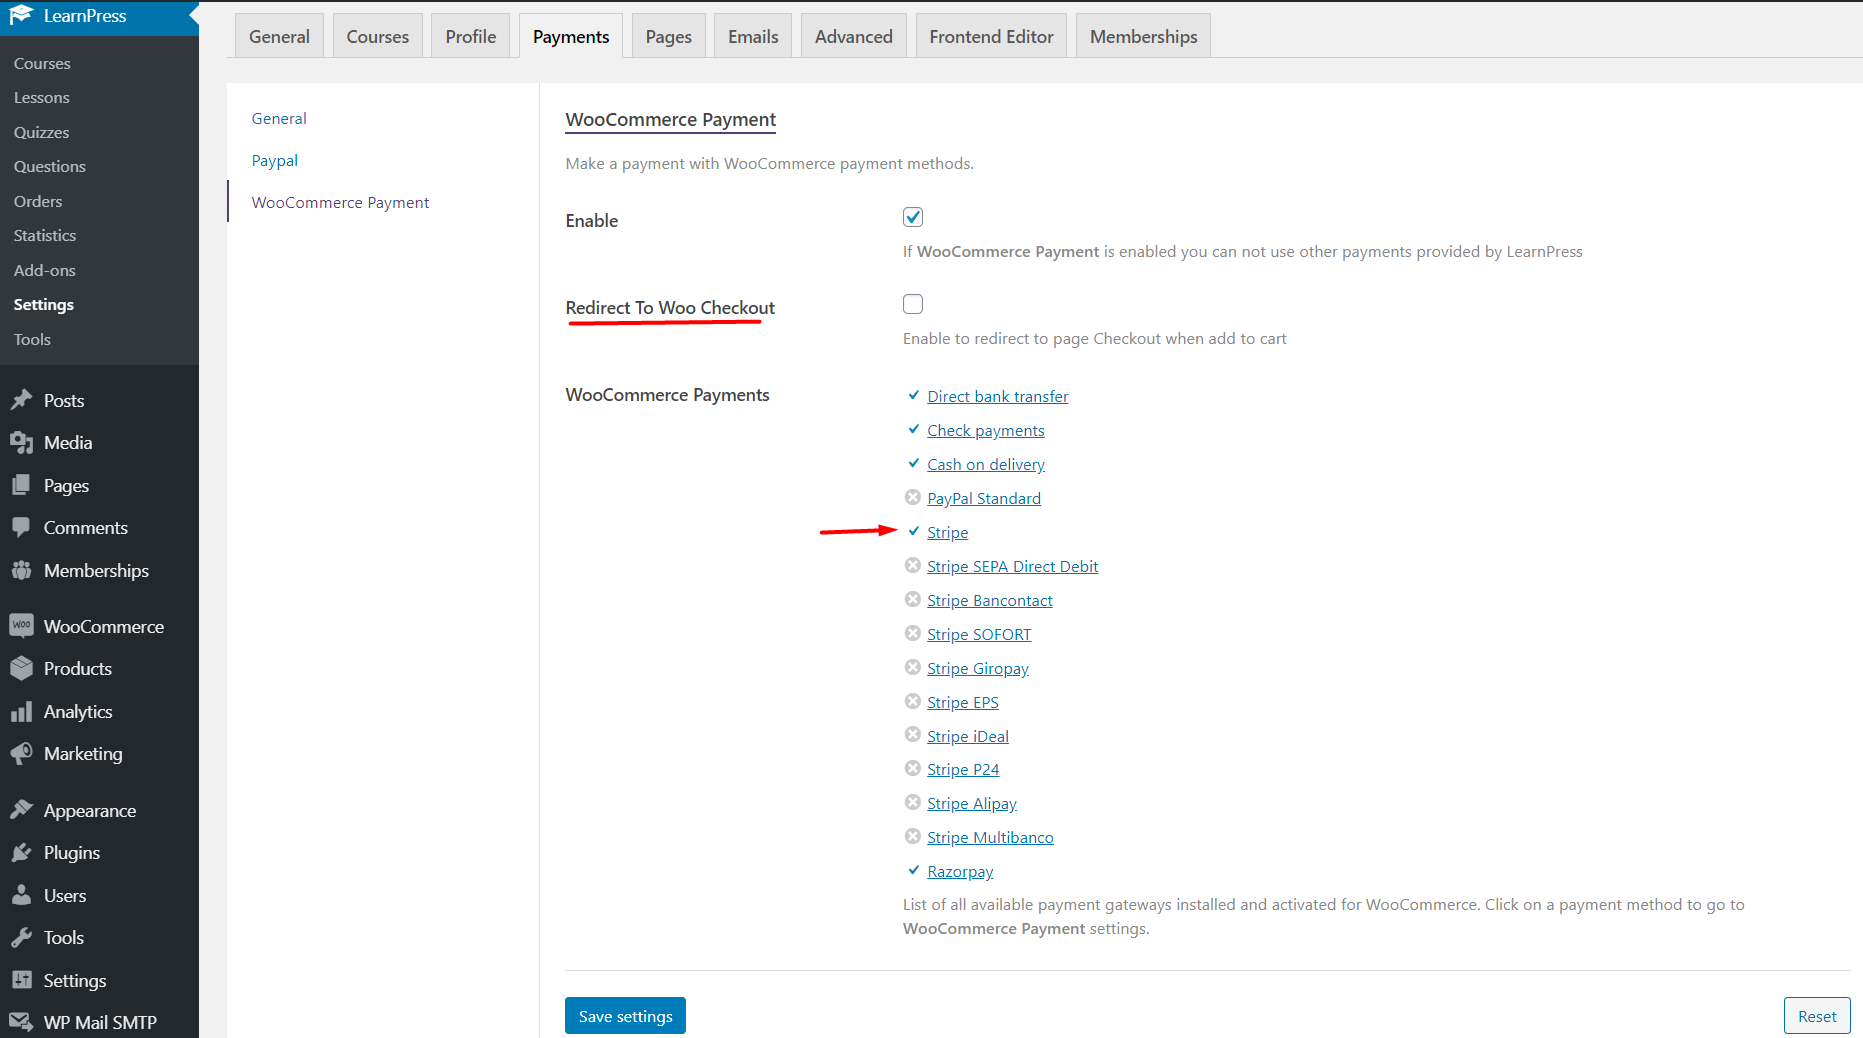
When you enable the WooCommerce, the “Buy this course” button will change to the “Add to cart” button. The “Redirect To Woo Checkout” option will redirect users to the WooCommerce checkout page after they click on the “Add to cart” button.
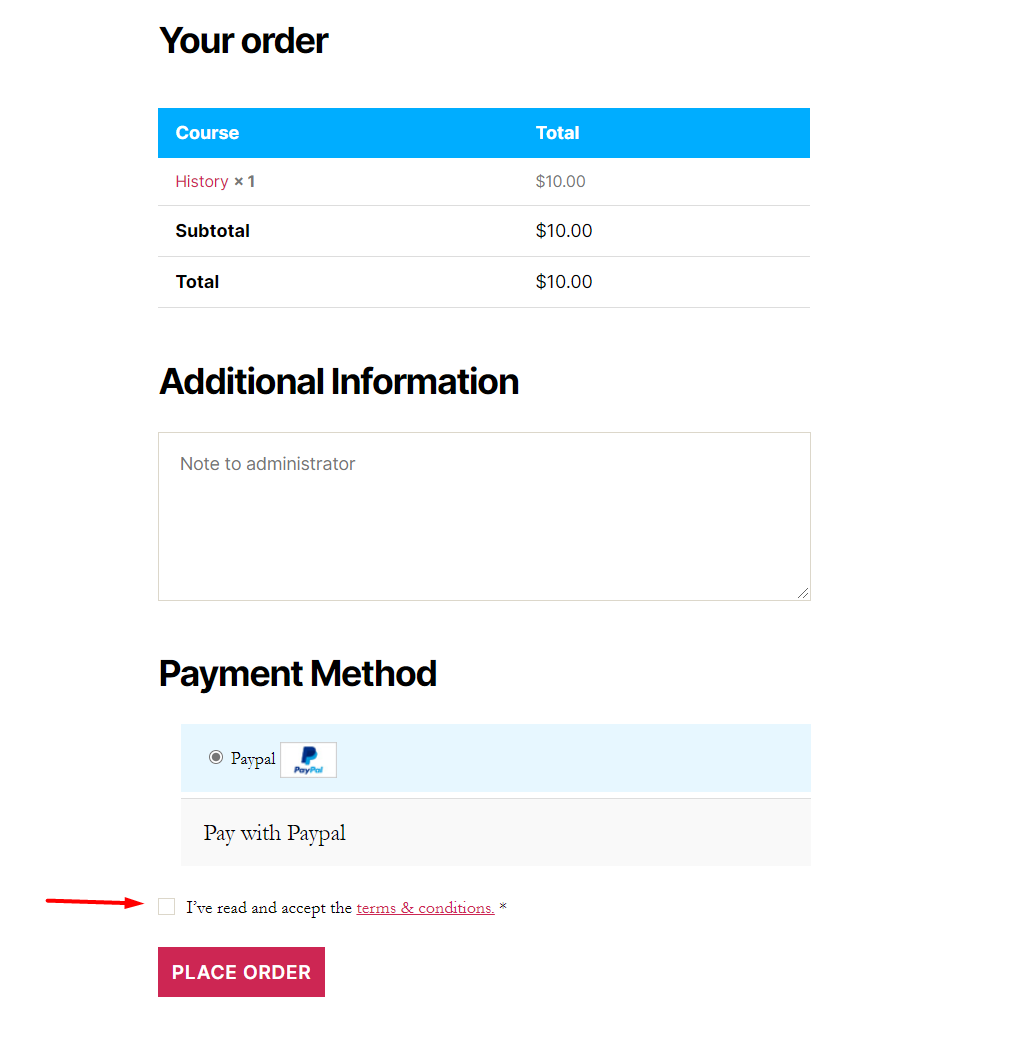
You can make users agree with your Terms and Conditions before placing an order by creating a Terms and Conditions page and set in the LearnPress settings. Then it will display and is required to be checked.
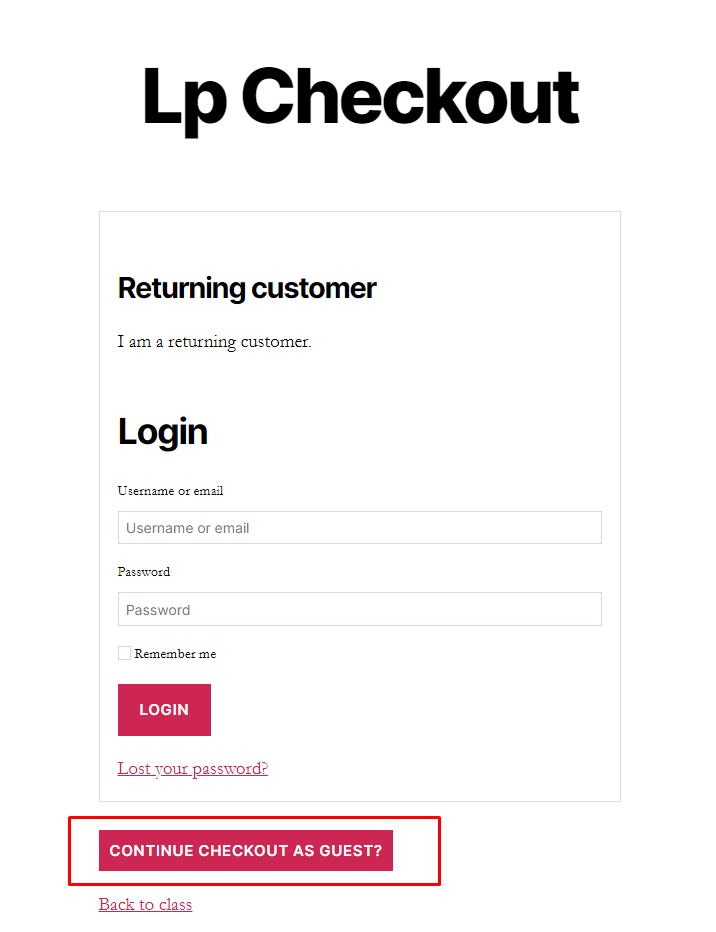
If you want users can buy the course without login, you can enable “Enable Guest Checkout” in LearnPress payment settings. When users didn’t login and press the “Buy This Course” button, there is a “Continue checkout as guest?” button on the checkout page.
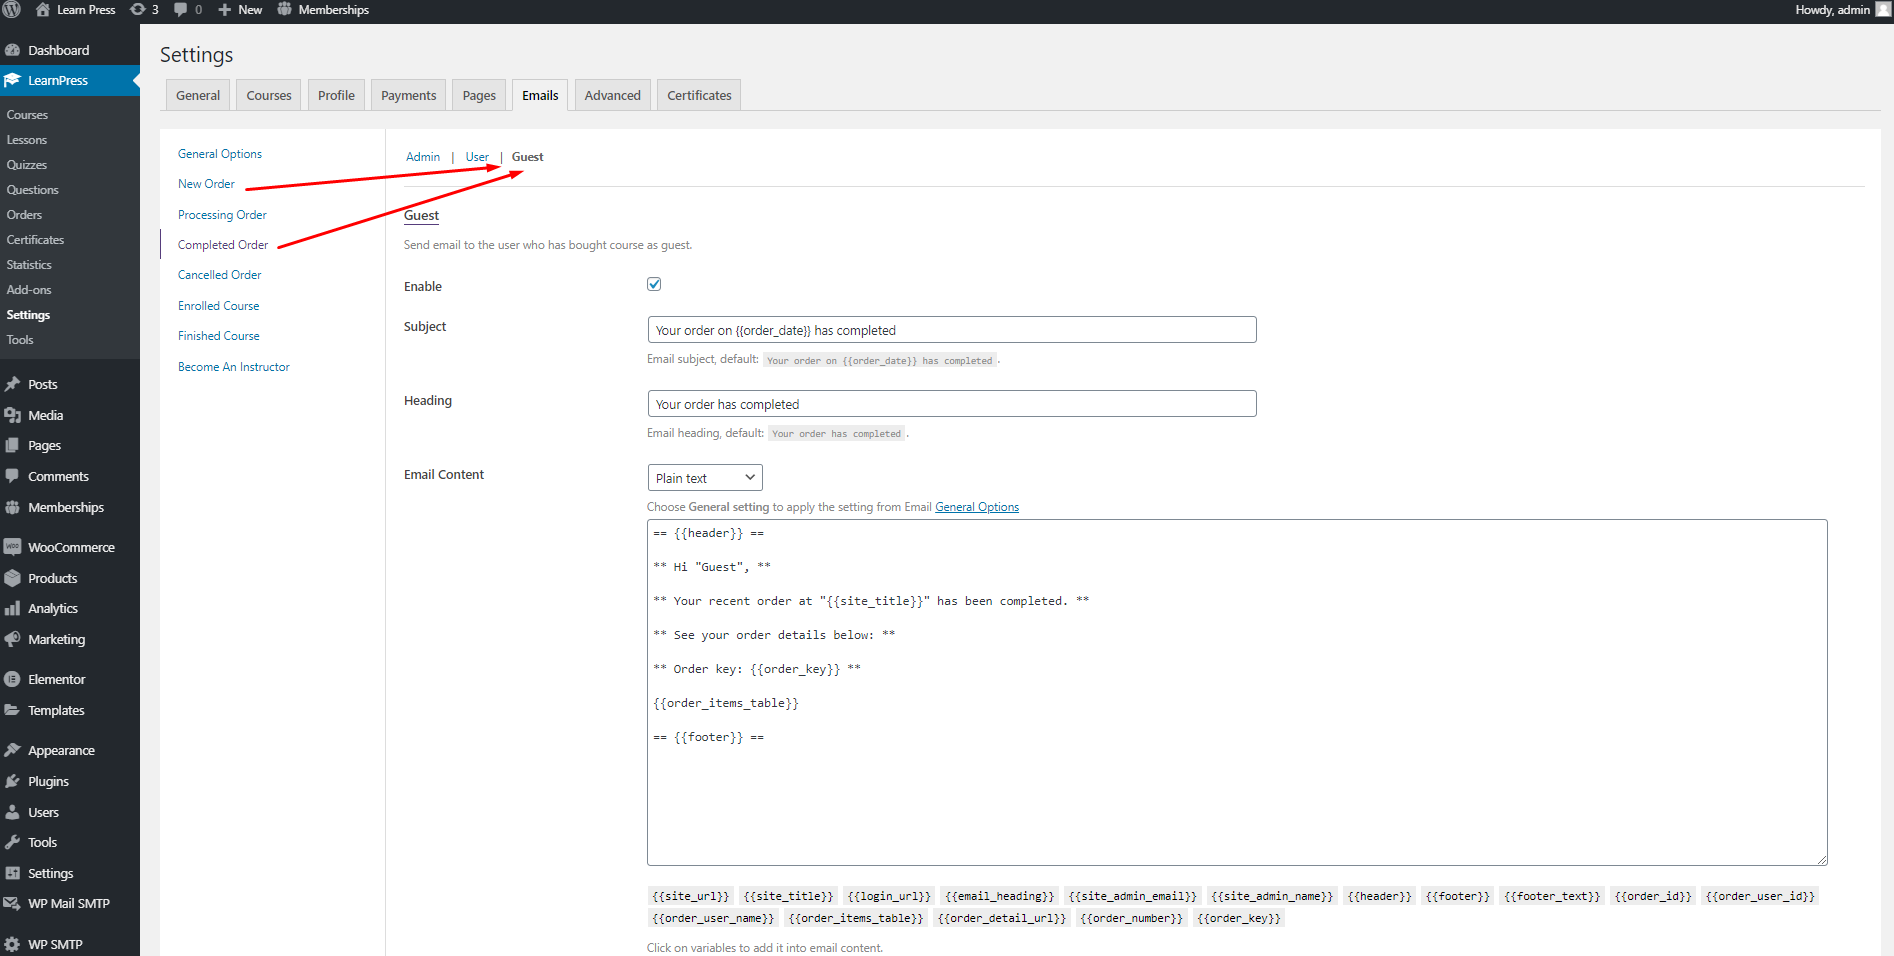
 Please make sure that you have enabled the Guess email in LearnPress => Settings => Emails
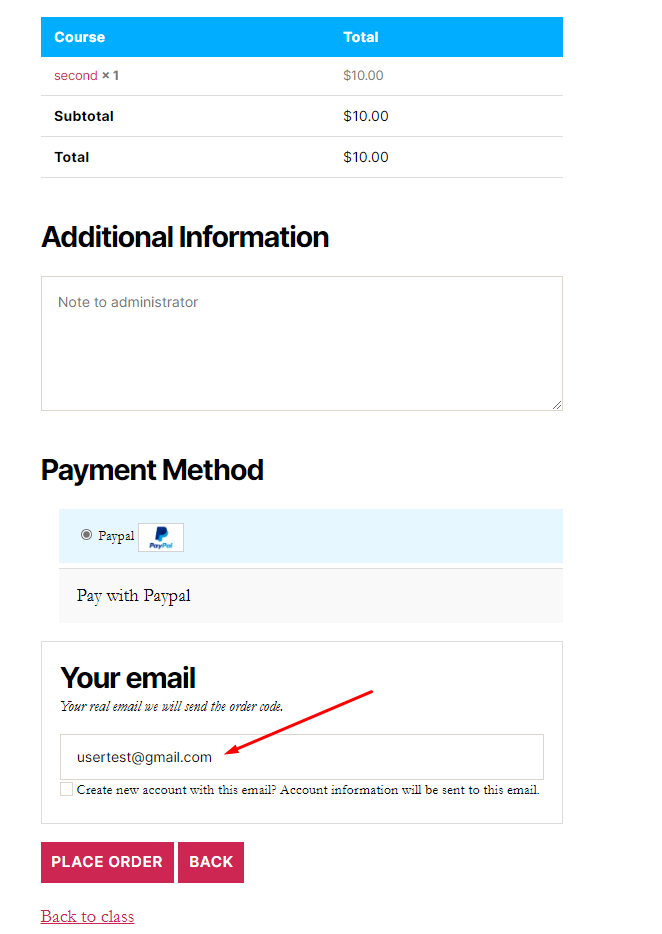
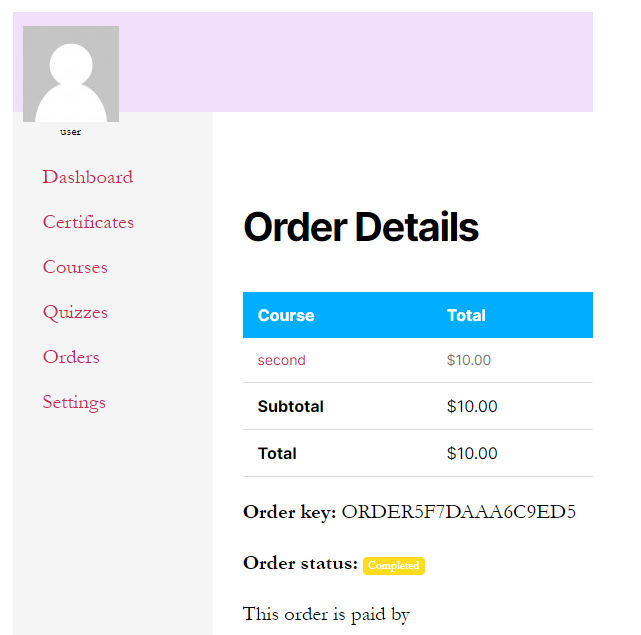
 On the checkout page, users need to enter the email address that they will receive the Order key to access the course. Visitors can choose if they want to create an account with the email on the checkout page or not.
Then users will get the email which contains their order key
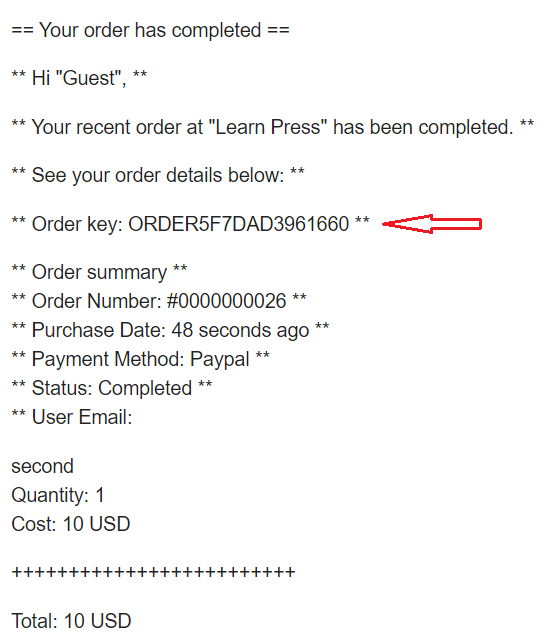
The course will be added to the account of the email that users used on the checkout page when they create a new account. Or if they want to use on another account, they can login with that account and submit the order they get in their email.
If the order is added successfully, the screen is like below:
Note: The “Guest Checkout” option only works with default LearnPress payment methods, not working with WooCommerce. If you use WooCommerce with LearnPress, users have to login to buy the course.
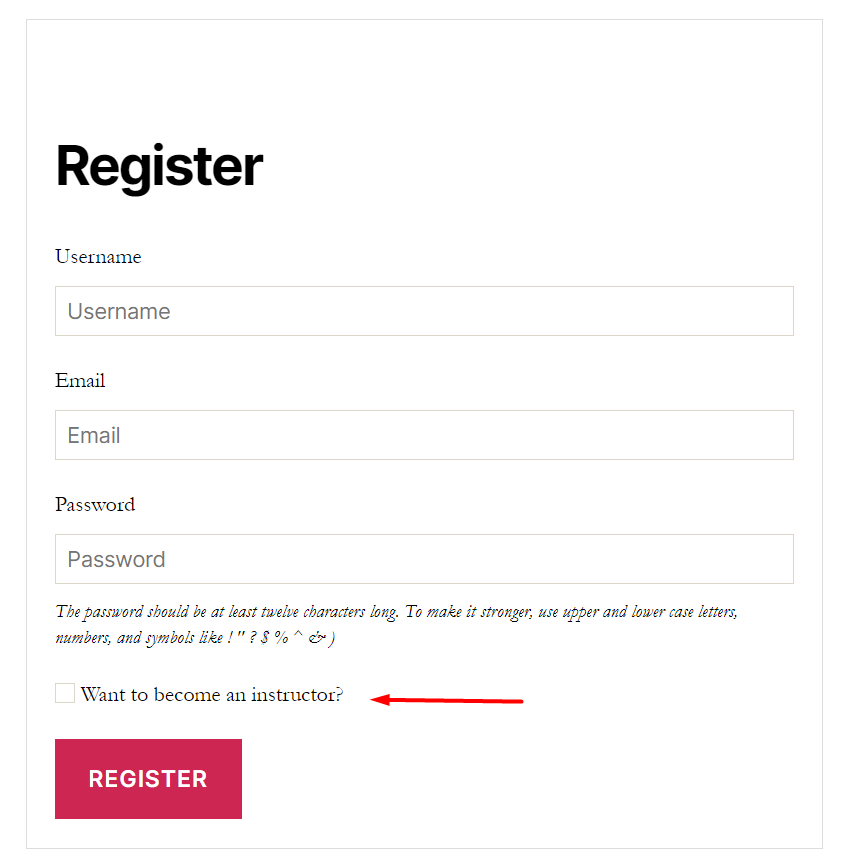
11.Become a teacher
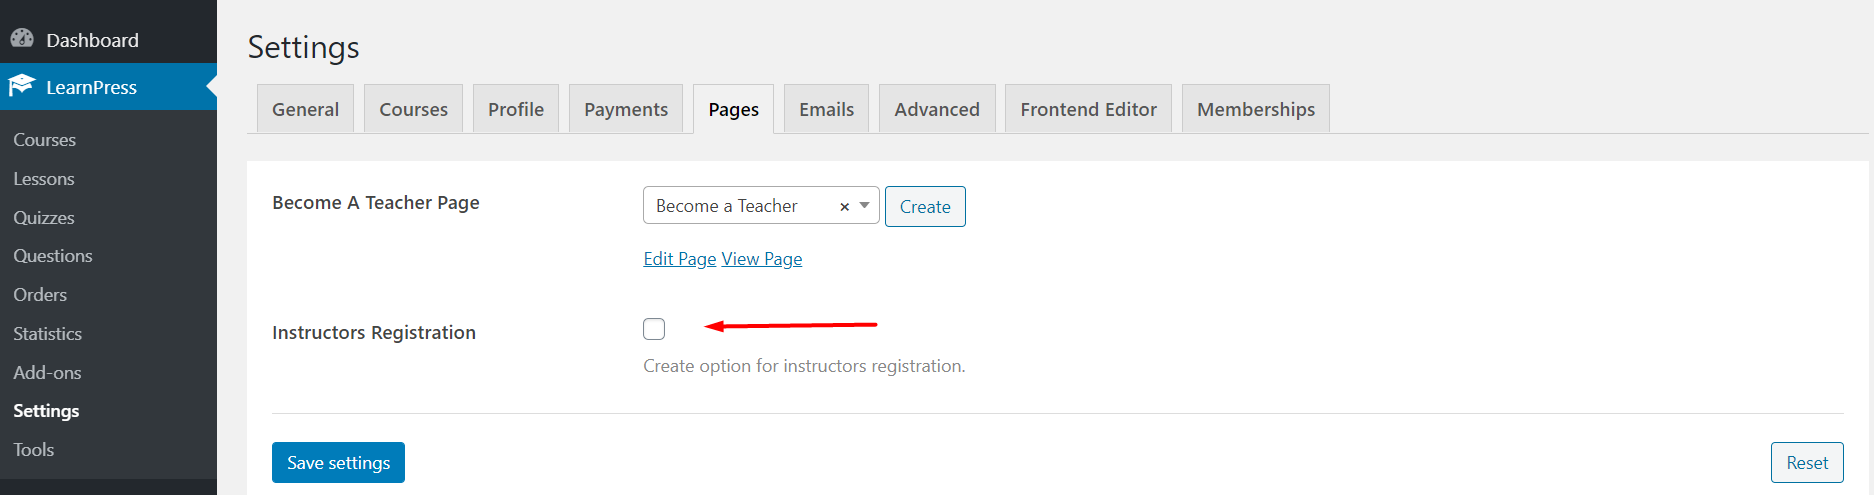
When you enable the “Instructor Registration” option in LearnPress => Settings => Pages. Users can register and request to become a teacher at the same time by click to the “Want to become an instructor” checkbox on the registration form.
 We have a default form for the user to request to become a teacher on your website, it is the “Become a Teacher” page, and you can find it in Dashboard => Settings => Pages => Become A Teacher Page, then click “View Page”
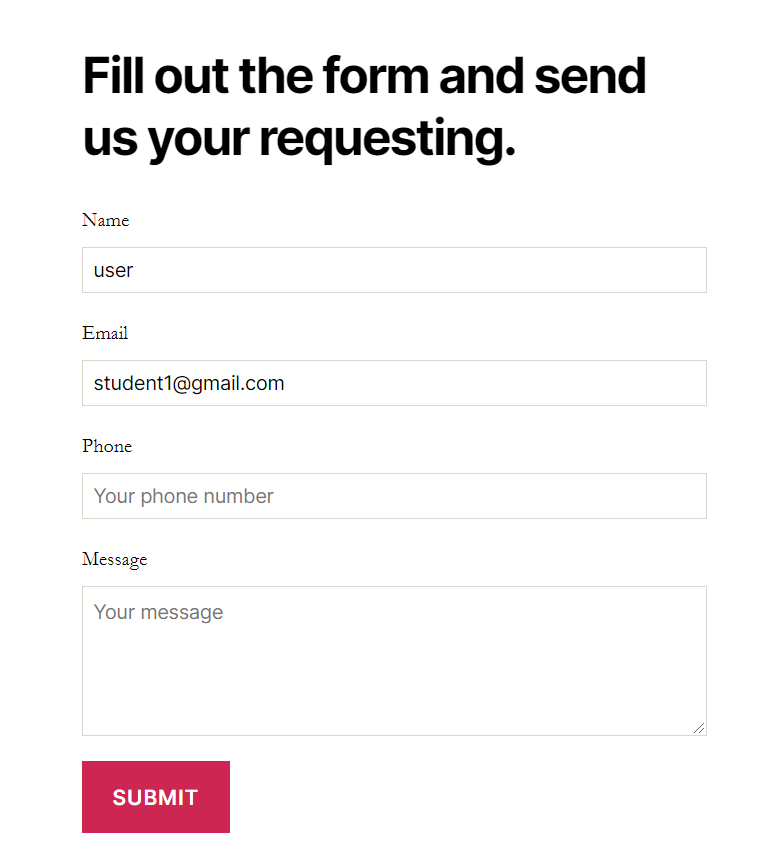
You are able to change the text with some translate plugins, but you cannot edit this form.
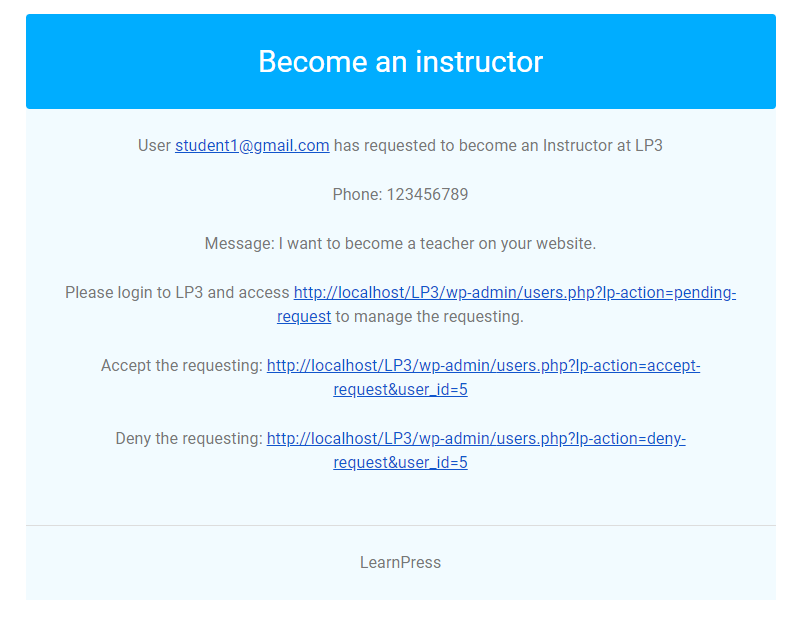
Users have to login to fill this form. After a user filled the form, the admin will get an email about the submitted form. You need to enable become a teacher email in LearnPress => Settings => Emails => Become An Instructor.
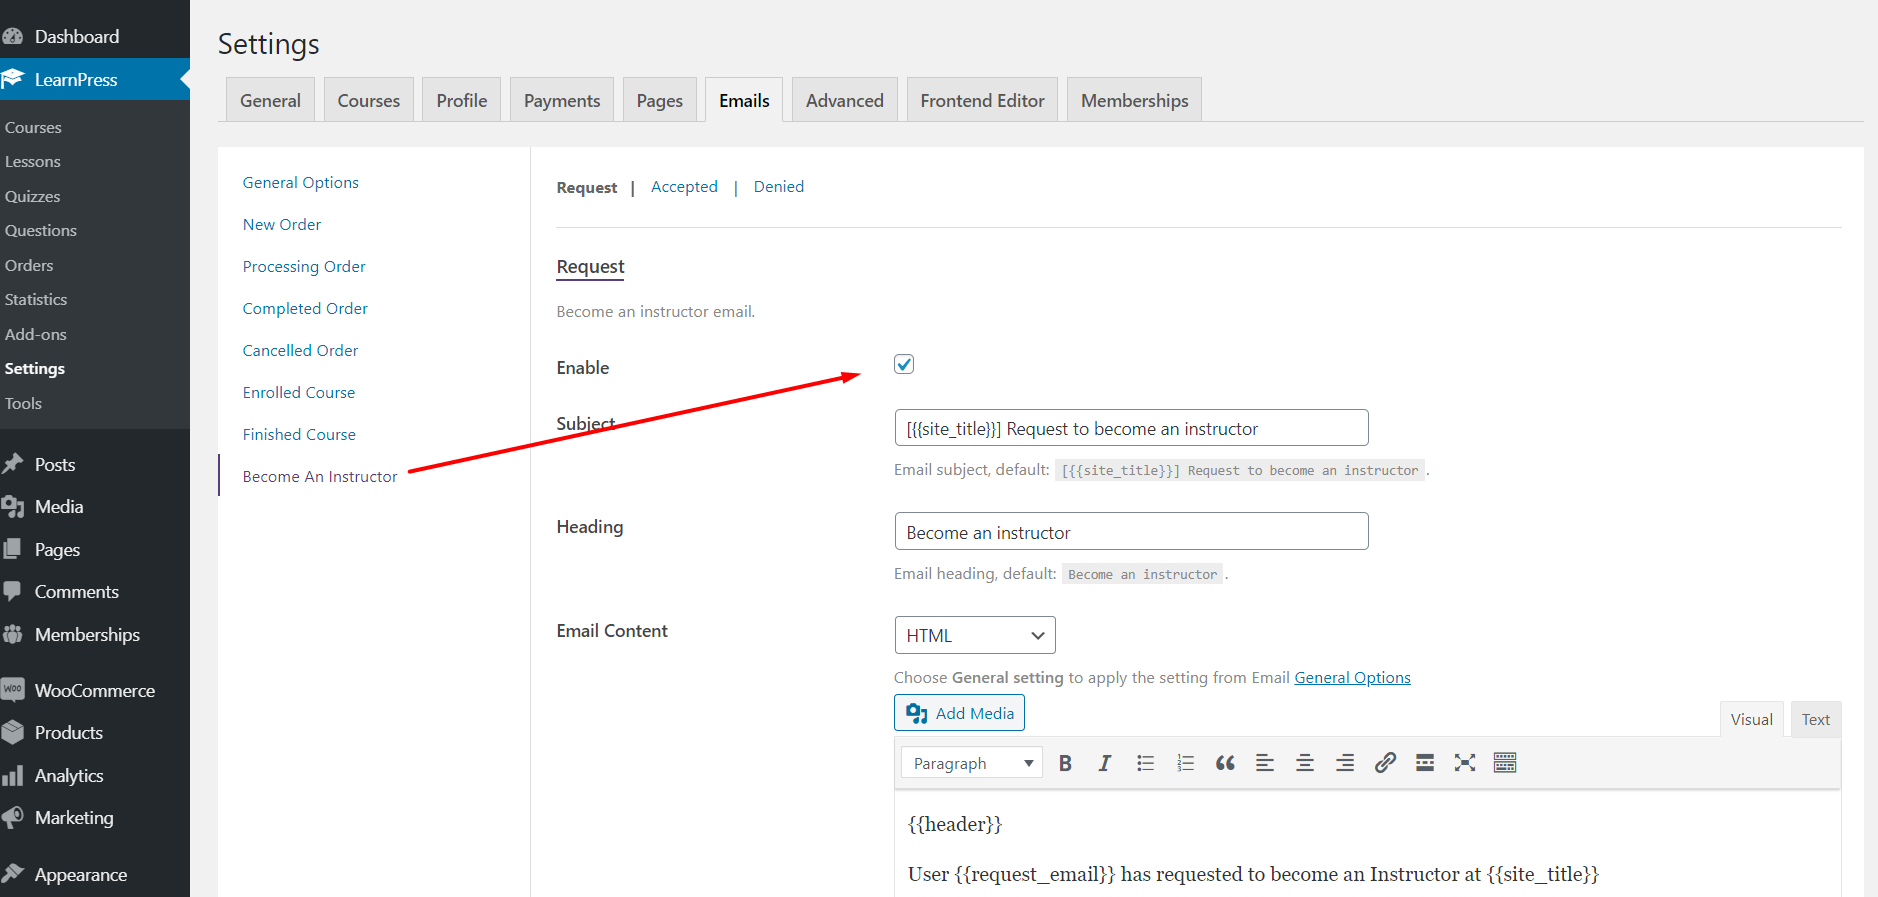
In the email content, admin can view/accept/deny that request.
12.Emails
All emails which are sent from LearnPress are in Dashboard => LearnPress => Settings => Emails
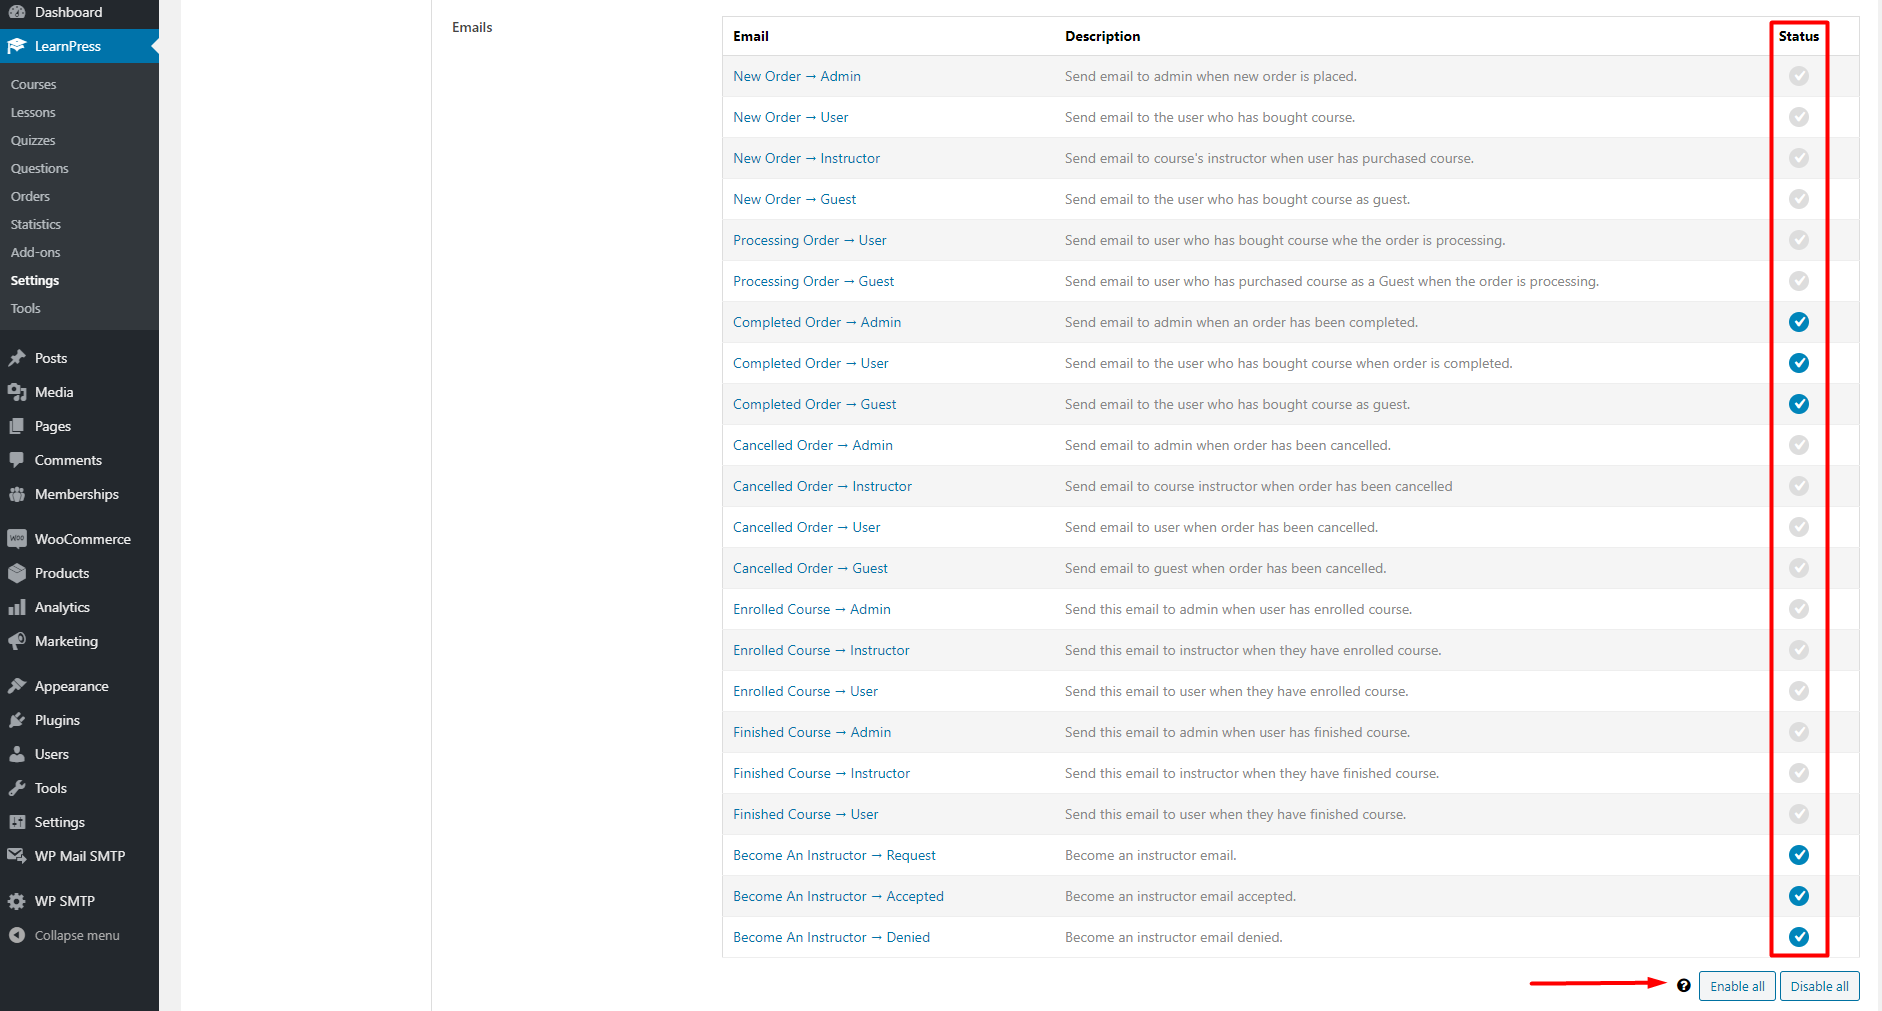
You can see all the active emails in this place. If you want to enable/disable any type of email, you can click to the circle checkbox to change its status. And if you want to enable/disable all emails, you can click to the “Enable all” or “Disable all” button.
You are able to edit the email content by clicking to the email name to edit it.
13.Memberships
If you are using our Paid Membership Pro add-on for LearnPress to integrate LearnPress with plugin Paid Membership Pro, please change the “Log In Page” in Paid Membership Pro to “Use WordPress default”. Because if you choose “Log In Page” is Log In, it may result in a conflict with our LearnPress, such as user cannot change their password.
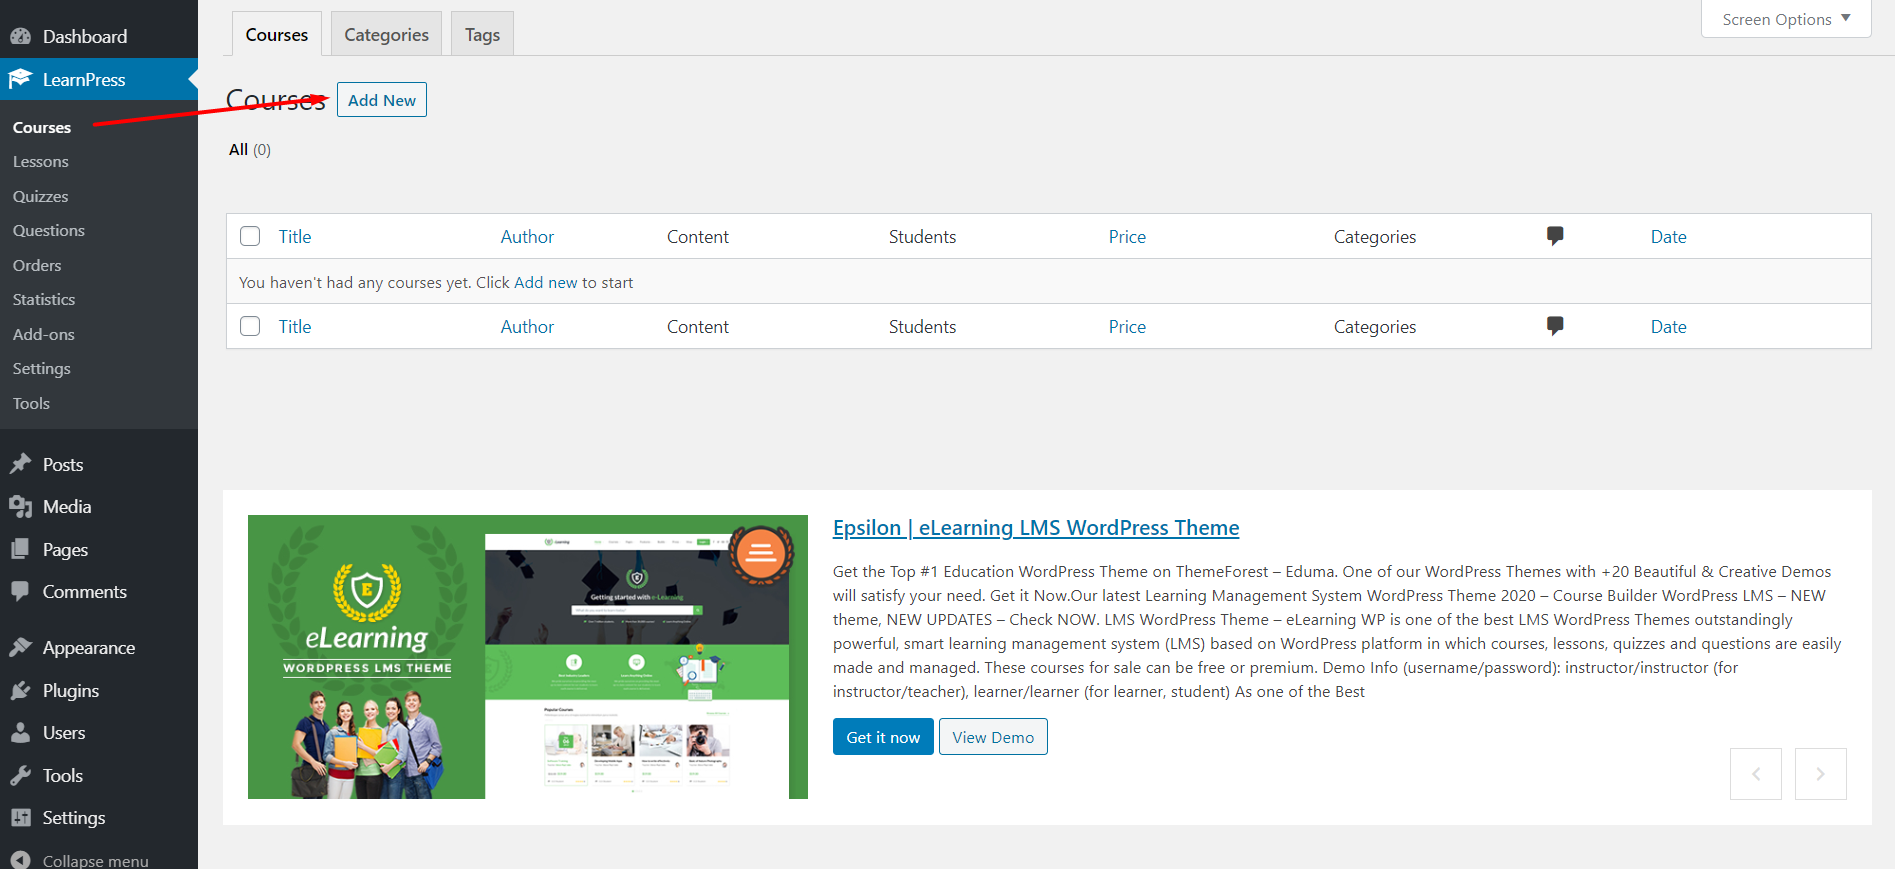
14.Courses
In this section, we will show you how to create courses.
15.Create a course
To create a course, you can go to your Dashboard => LearnPress => Course => Add New
There are three sections in a course: Course overview, course curriculum, and course settings.
16.Course settings
There are many options in the “Course Settings” section for you to configure your course.
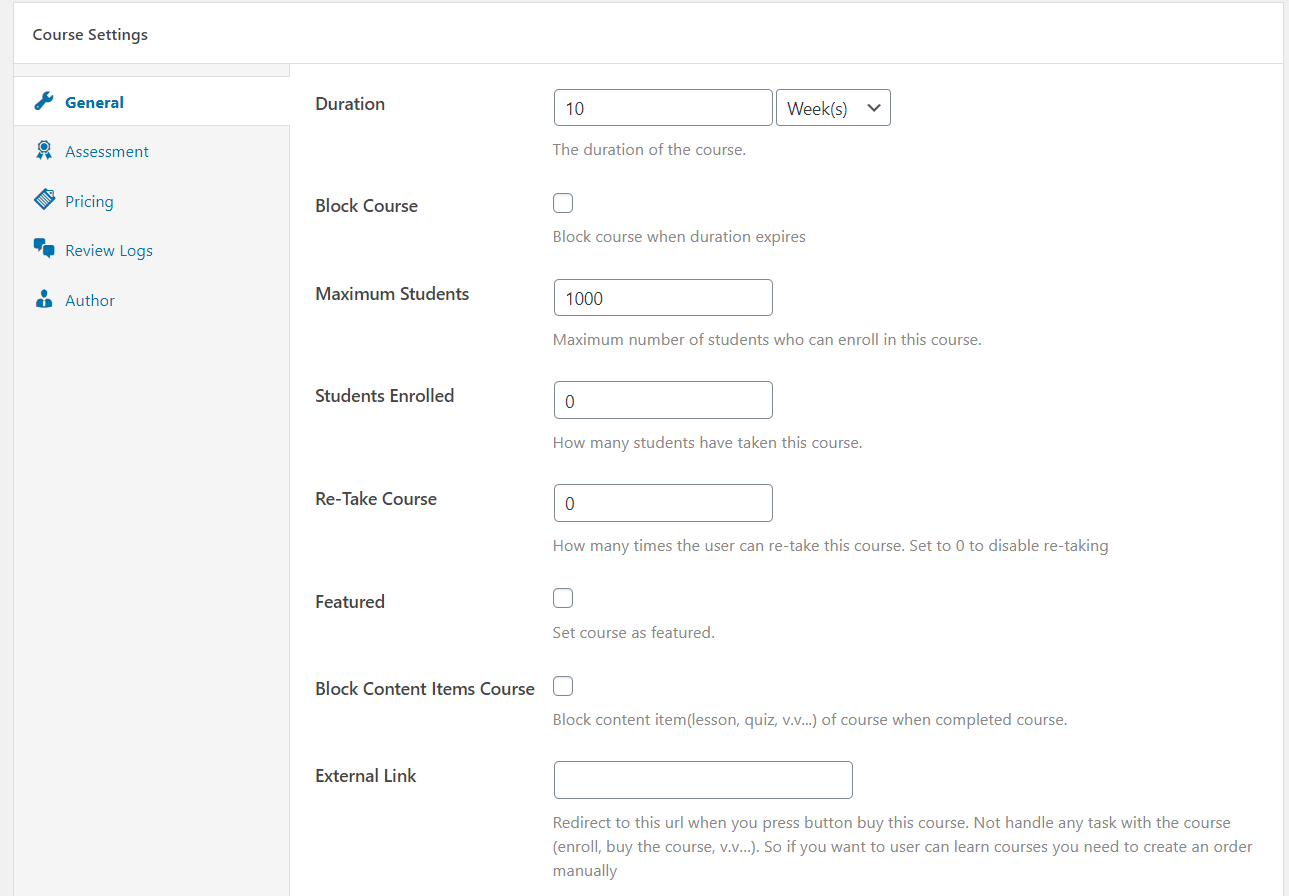
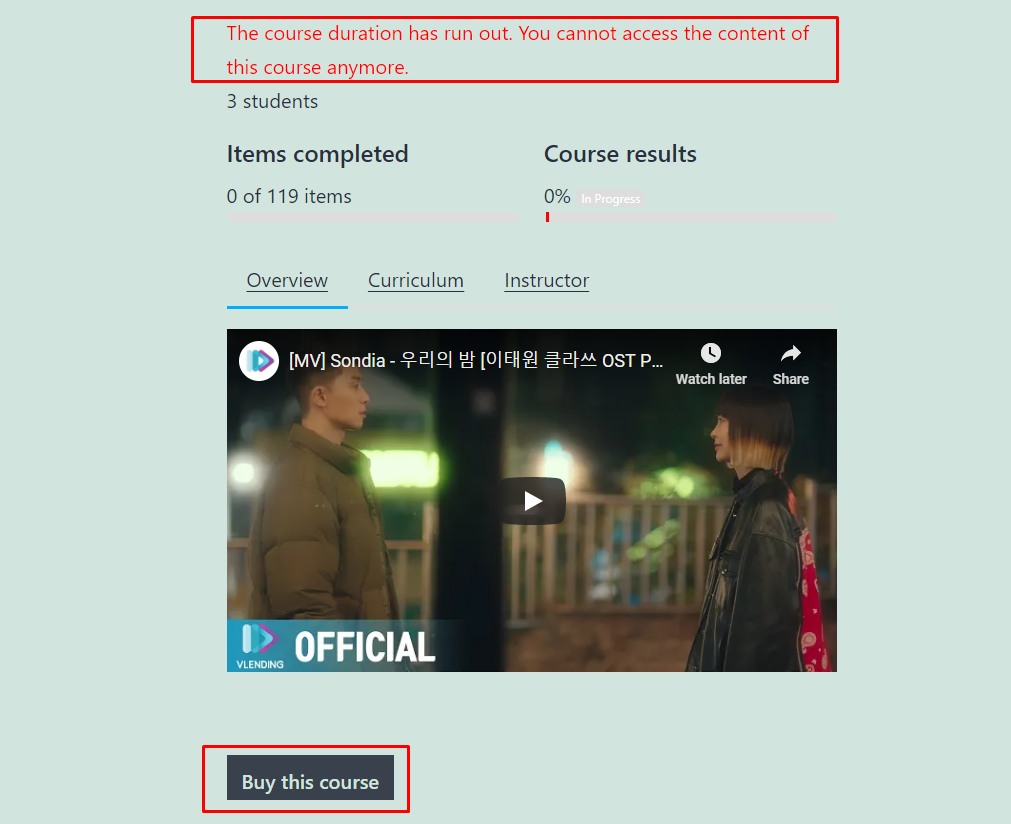
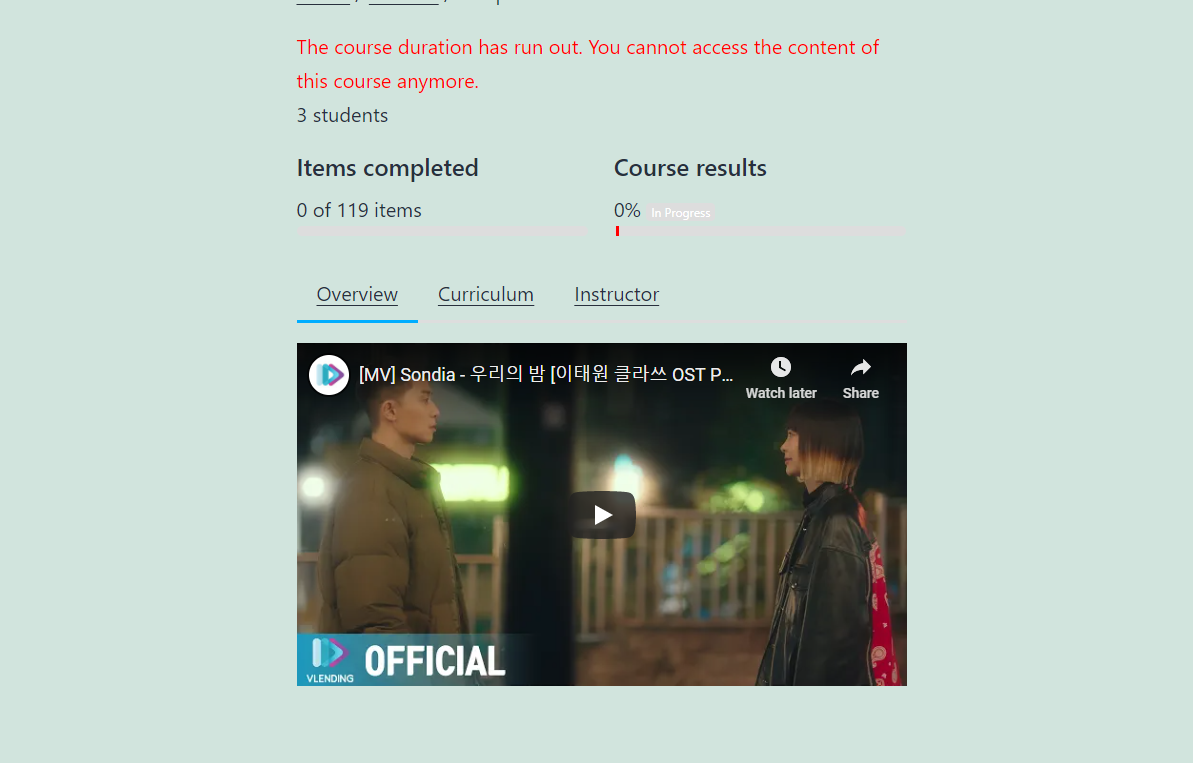
- Duration: The duration of the course. It will be counted from when students enroll in the course.
- Block Course: Block courses when the duration expires. Students will not able to see the course content anymore.
- Retake Course: The times a student can retake that course after that student finished the course.
- Block Content Items Course: Block the course content after a student finishes the course.
- External Links: Redirect to the link you put. Use this when you want to link the course to the course on another website.
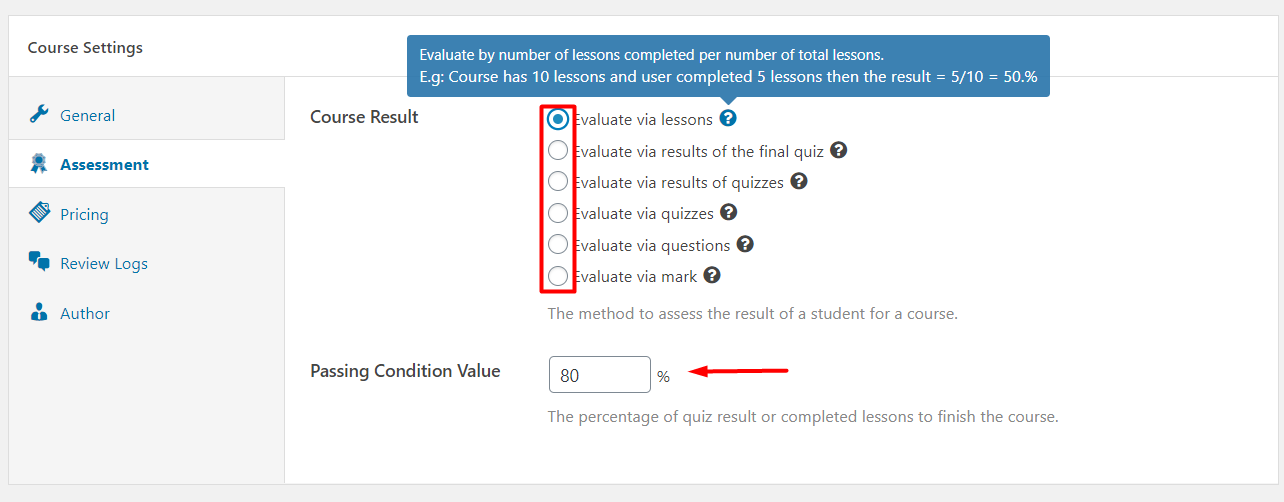
You can choose the Passing Condition for a course with the Assessment tab. We have 6 basic options for a course. You can hover the mouse over the question mark to see their descriptions and examples.

We allow you to set the sale price for a course, you can even set the start time and end time for that sale promotion.
The option “No Requirement Enroll” is only available when you set the price is 0. Users needn’t to login or enroll the course to access and learn that course.
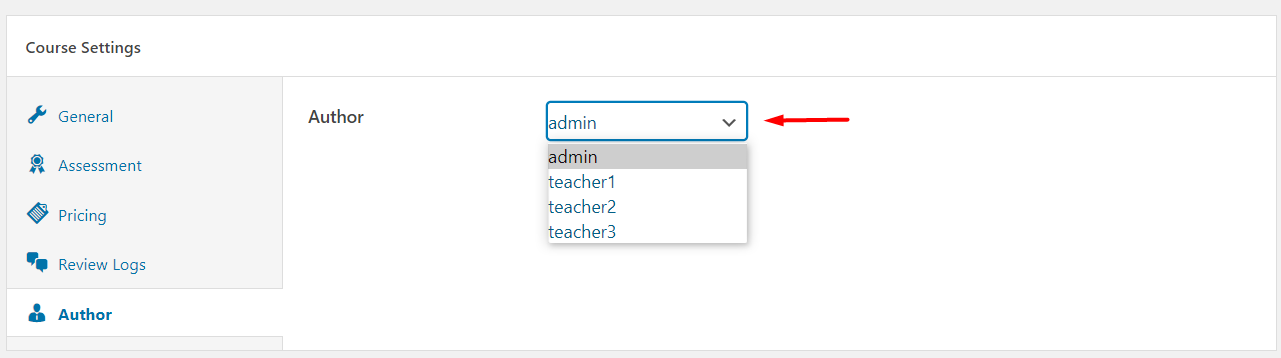
As an admin, you can change the course’s author, you can assign the course to another instructor. LearnPress only supports to set one author for a course, if you want to assign more than one instructor to a course, you can use our plugin “Co-instructor add-on for LearnPress”, you can find it here: https://thimpress.com/product/co-instructors-add-on-for-learnpress/
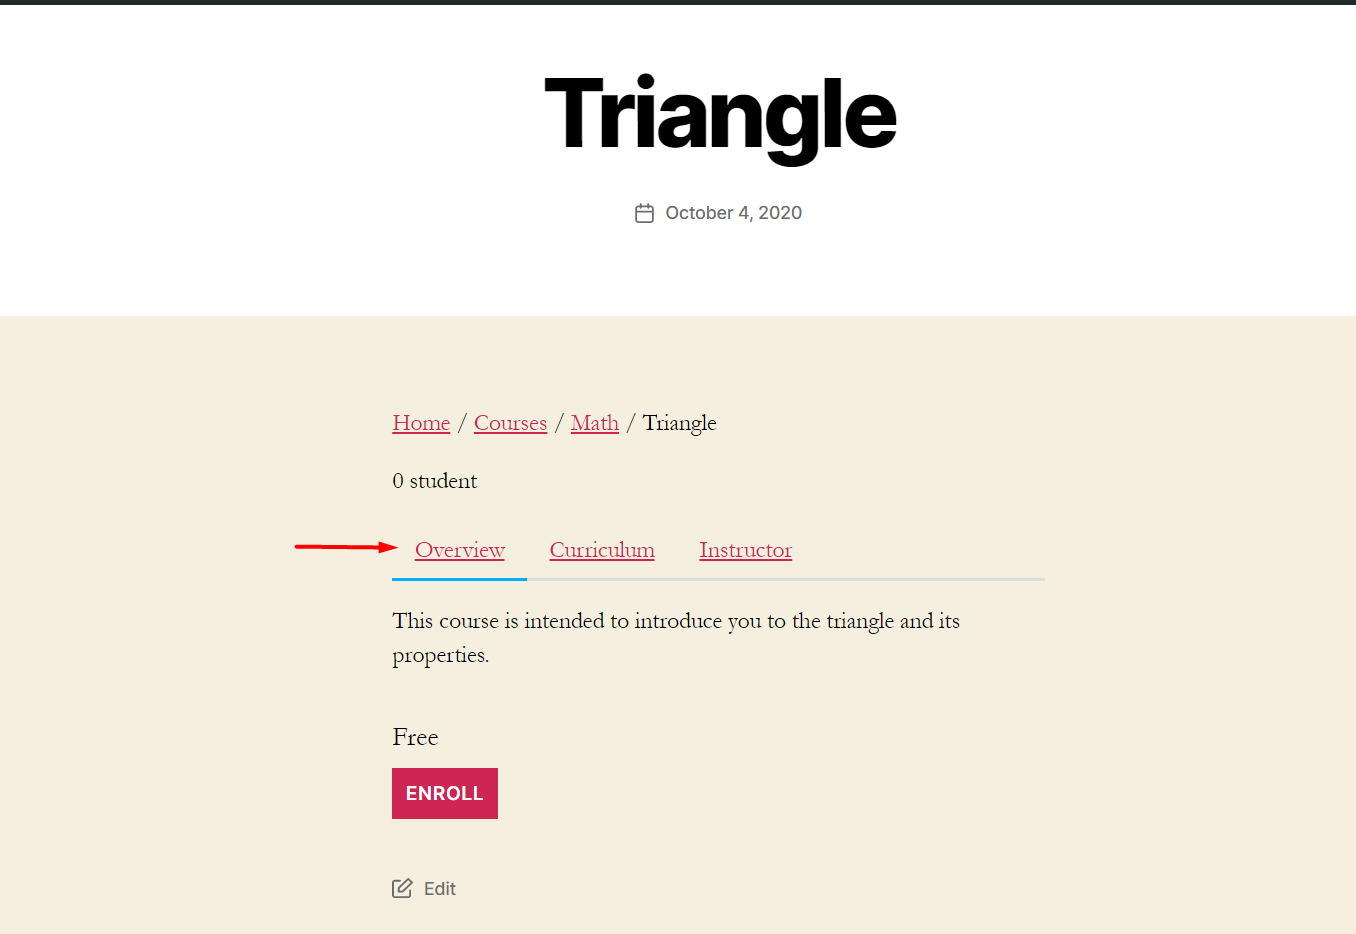
17.Course overview
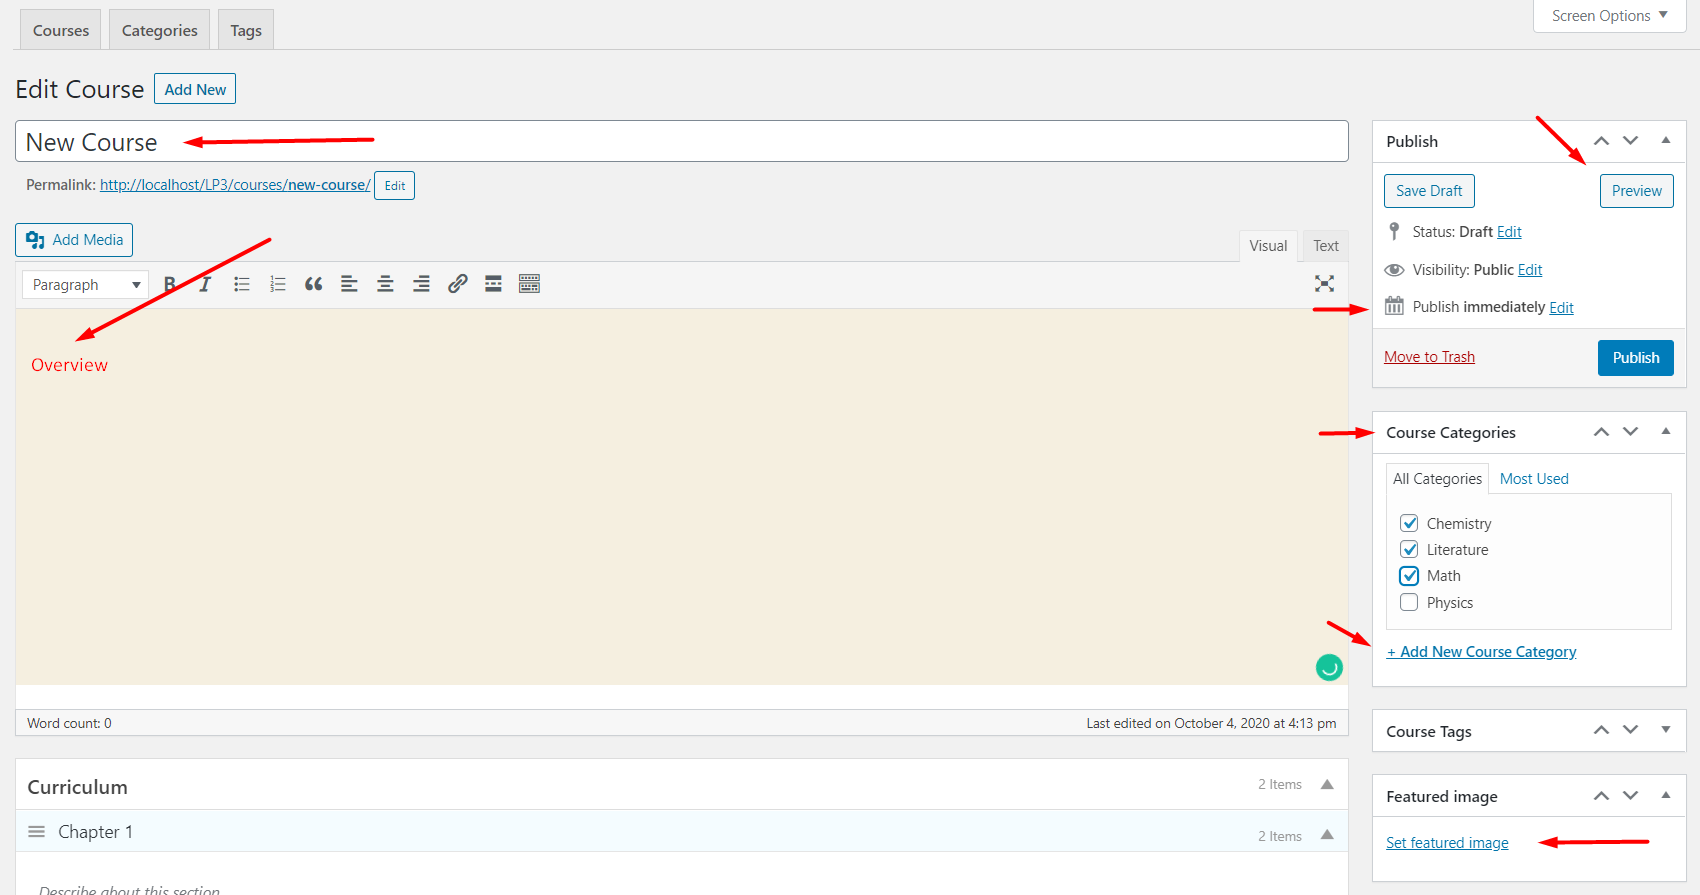 In the Course Overview section, you can set name and introduction to the course, what you wrote will be displayed in the Overview tab in the single course page.
You also can set the publish date of the course, student can only see and enroll the course when it is published.
You can choose to assign a course to one or many categories in the “Course Categories” area. You should choose the “Featured image” for all courses, the feature images will be displayed on the Courses page. If you don’t set the “Featured image” for a course, our system will display the default image.
And you should preview your course before you publish it.
18.Course curriculum
All the sections, lessons, quizzes of the course will be displayed here.
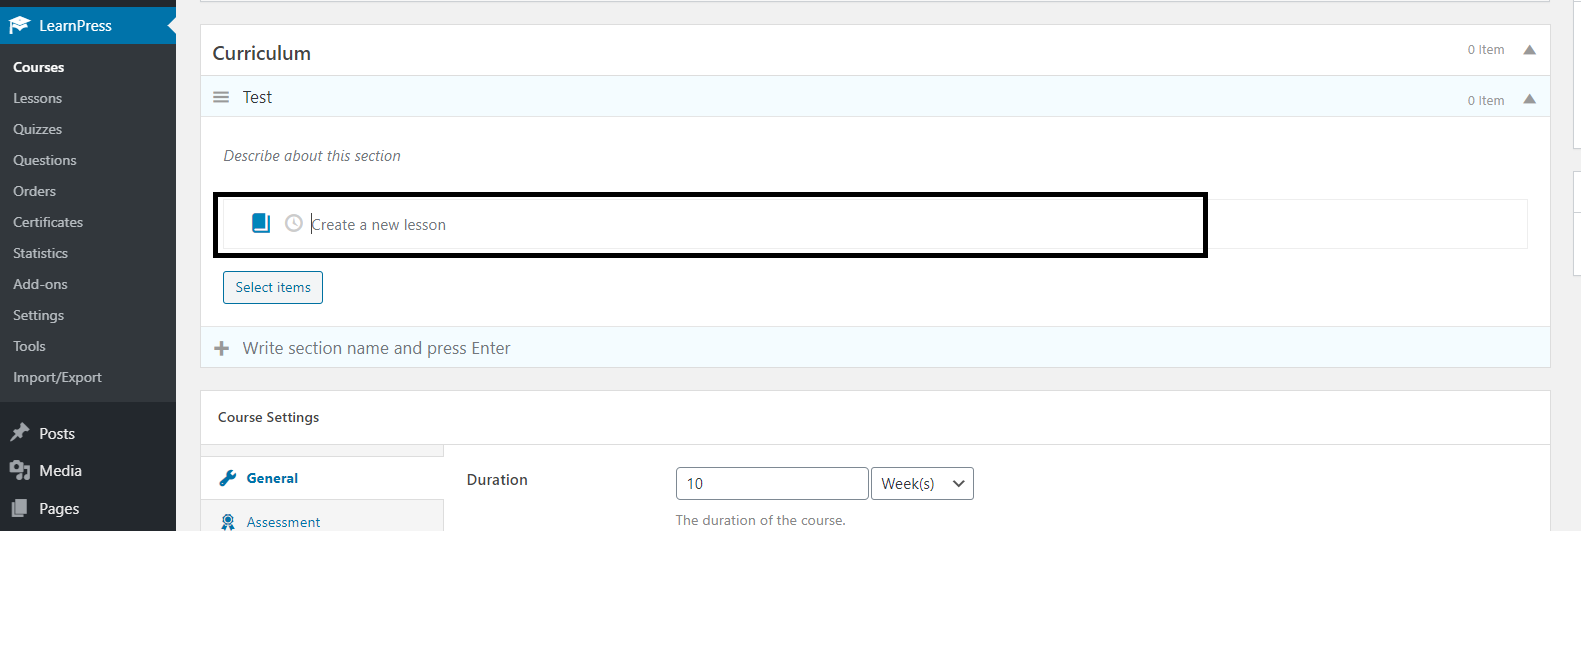
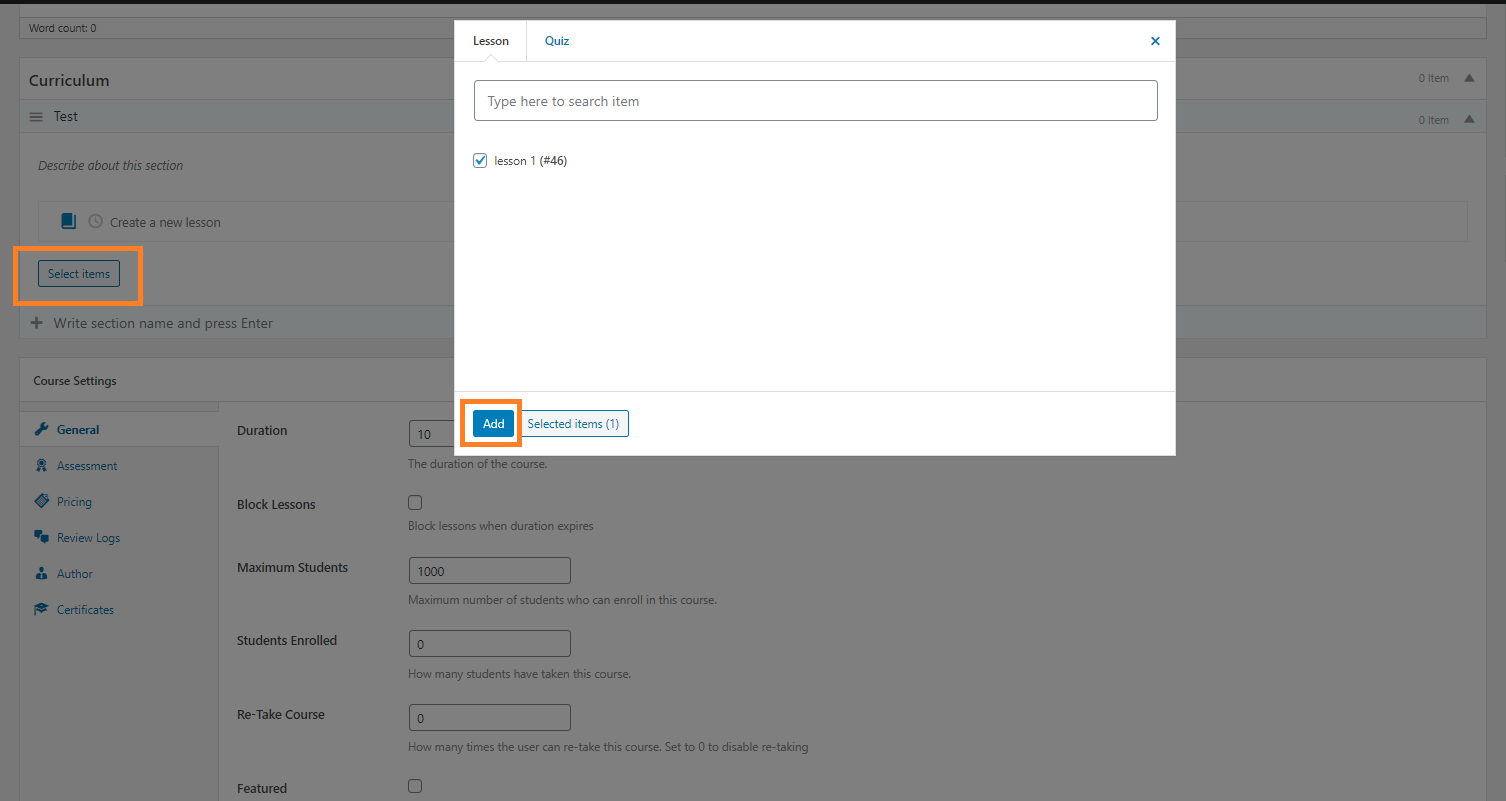
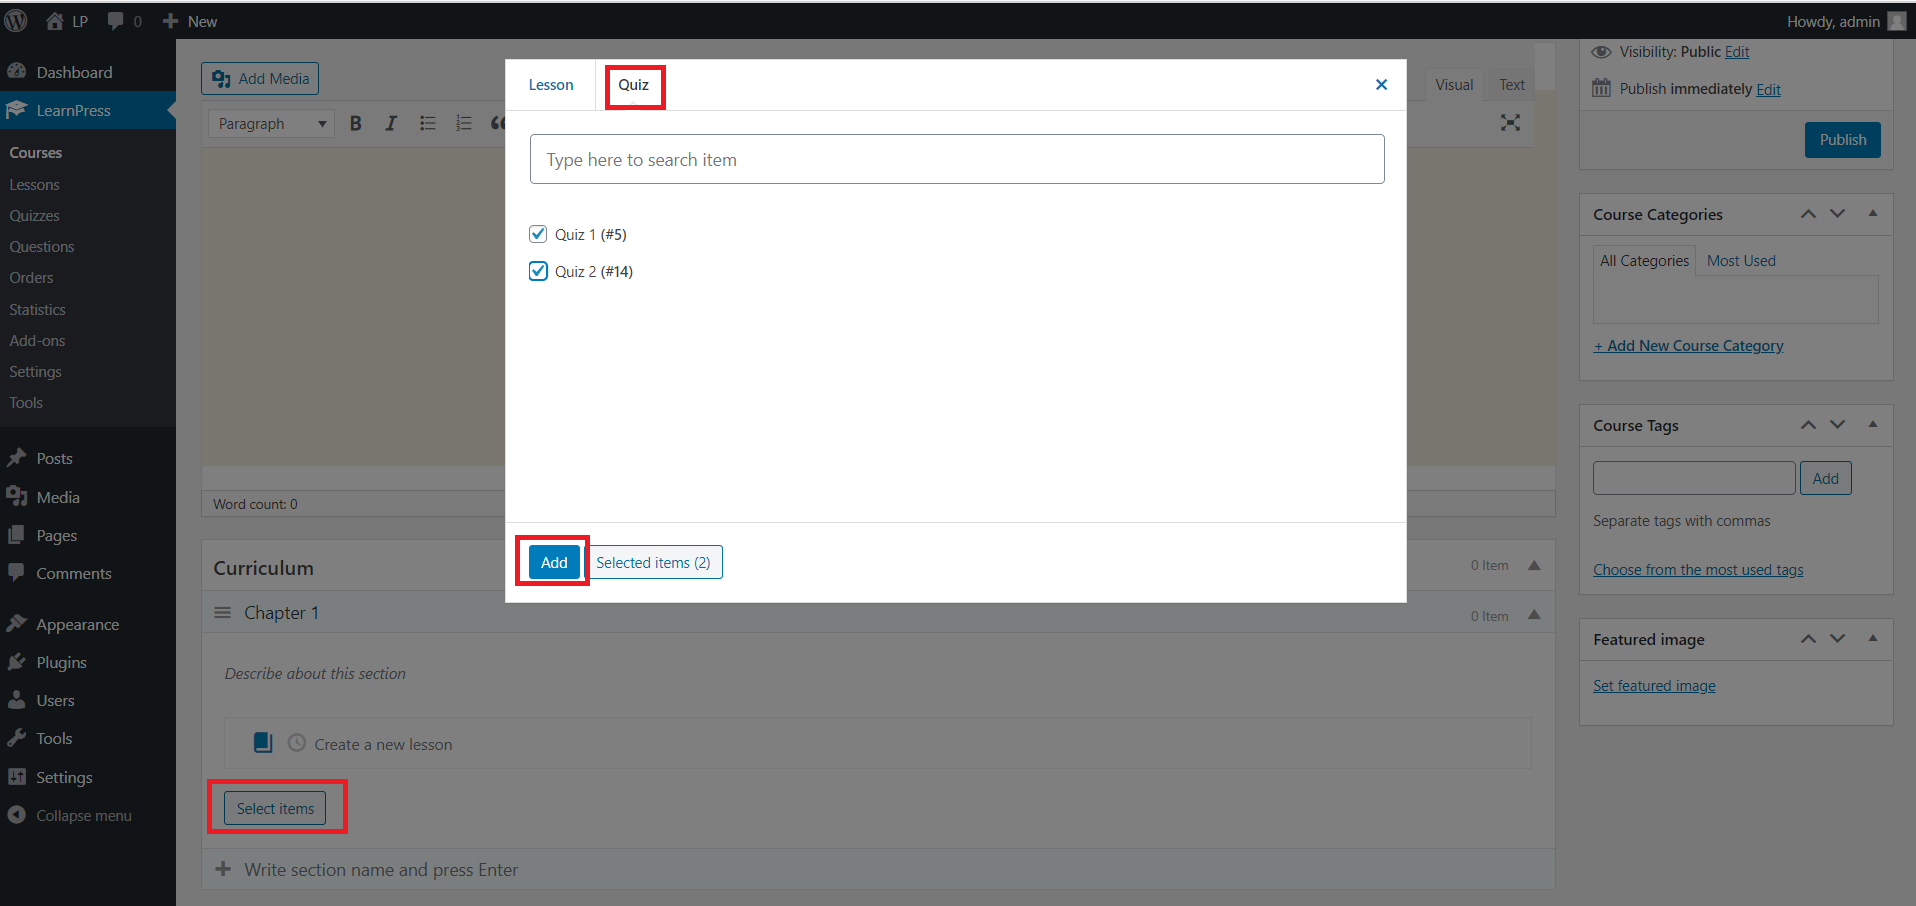
You can click to the “Select items” button to select the items (lessons, quizzes) you want to add to the course. Please note that you only can add the course that has not been assigned to any course. You are able to create lessons, quizzes in this section, the book icon is a lesson, the clock icon is a quiz, you can click “Edit” to edit the item on the new tab.
19.Repurchase
In version 3.2.8.4 of our plugin LearnPress, we have added a new function “Repurchase” which allows users to buy the course after they finish the course or be blocked because of out of duration.
I.Free course
The repurchase function does not work with free courses.
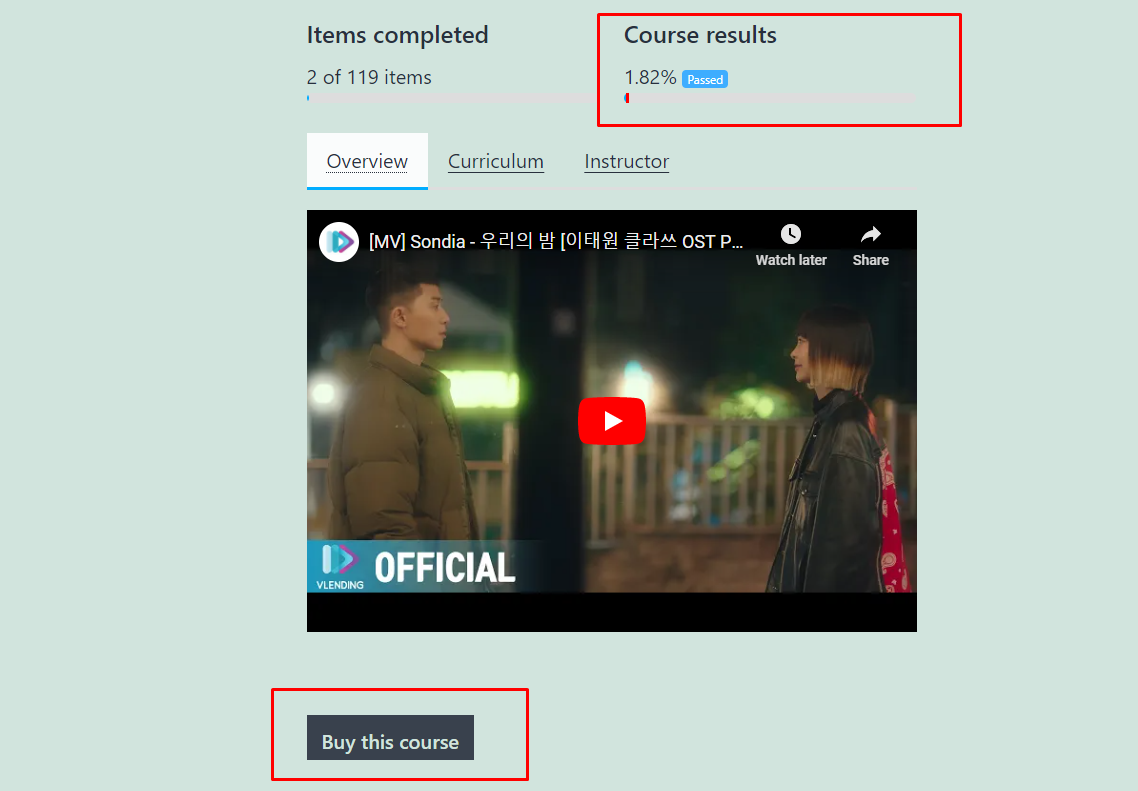
After the user finishes the course, the “Buy this course” button will not be displayed. If Instructor set “Retake” for that course, the “Retake” button will be displayed.
II.Paid course
1. Buy course via Lp-checkout
a) Enable the Repurchase option in the Course setting.
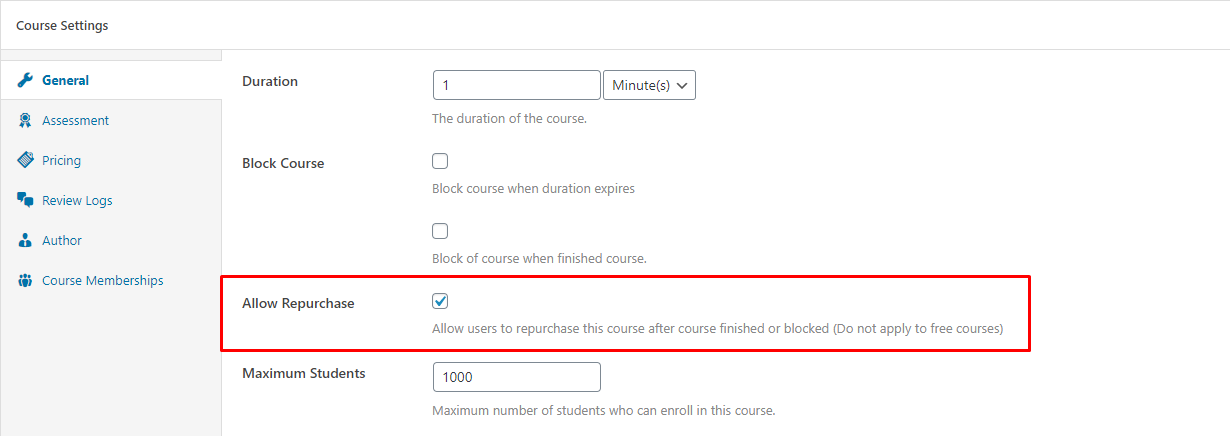
– After students finish the course, the “Buy this course” button will display.
– When the duration expires, if the option “Block course when the duration expires” is enabled, the button “Buy this course” will be displayed.
– In case the student can retake the course, When a user has used up “Retake” times, the “Buy this course” button will be displayed.
b) Disable the Repurchase option in the Course setting.
– After students finish the course, the “Buy this course” button will not be displayed.

– After duration expires, if the option “Block course when the duration expires” is enabled, the button “Buy this course” will not be displayed.
– In case students can retake the course, when a user has used up the “Retake” times, the “Buy this course” button will not be displayed.
2. Buy course via Woocommerce
– Similar to LP Checkout, just change the “Buy this course” button to the “Add to cart” button.
3. Buy course via Membership
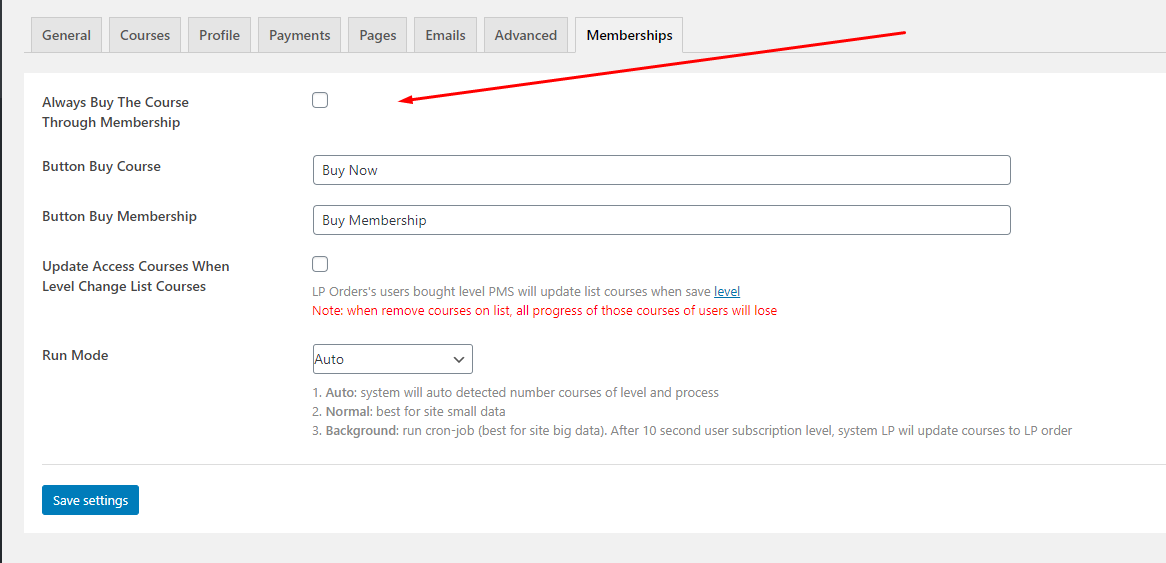
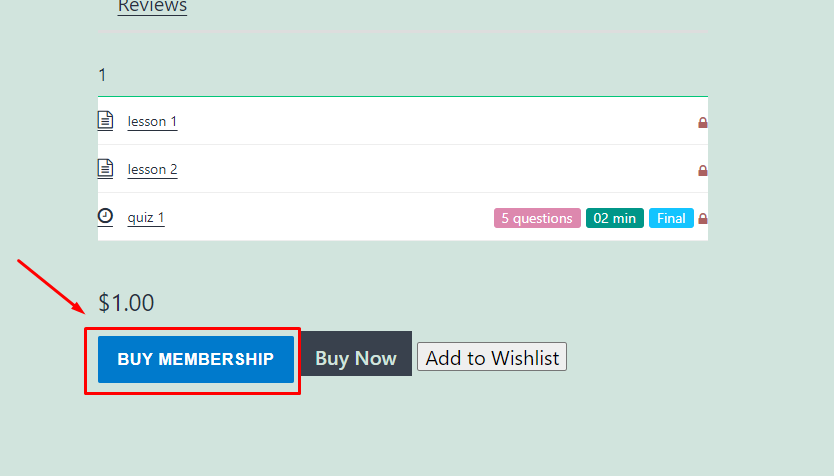
– If a course is assigned to Membership, also disable the option Always Buy The Course Through Membership.
 – At this point, the course will display 2 buttons “Buy membership” and “Buy now”.
a) Buy course through membership and option “Enable the Repurchase” is enabled.
– After students finish the course, the “Buy this course” button will be displayed.
– Once duration expires if the option “Block course when duration expires” is enabled, the button “Buy this course” will be displayed.
– In students can retake the course, when a user has used up “Retake” times, the “Buy this course” button will be displayed.
– If the option “Always Buy The Course Through Membership” is enabled. After students finished the course, the button “Buy This Course” and “Buy Membership” will not be displayed.
b) Select the “Buy Membership” button and Disable the Repurchase button in the course setting.
In all of the above cases, the “Buy this course” button will not be displayed.
c) Select the “Buy now” button and Enable the Repurchase option in the course setting.
– Once a student finished the course, the button “Buy membership” and “Buy this course” will be displayed. The “Buy Membership” button will be displayed until the user bought the Membership.

– If option “Block course when duration expires” is enabled, after the duration expires the button “Buy this course” is displayed.
– In case the Retake option is enabled, when user has used up the Retake times, the “Buy this course” and “Buy membership” buttons will be displayed. The “Membership” button will be visible until the user purchases the Membership.
d) Select the “Buy now” button and Disable the Repurchase button in the course setting.
When you disable “Repurchase” option, the “Buy this course” button will not be displayed. But right after the user completed the course, the “Buy Membership” button will display until the user Buy Membership.
If a course is assigned to Membership, enable the option Always Buy The Course Through Membership. At this time the course will display a single button called Buy membership. After Buy Membership and Completed course will not display buttons to buy Membership and Buy this course.
20.Lessons
In this section, we can create lessons, set their preview-ability, and add them to the course curriculum.
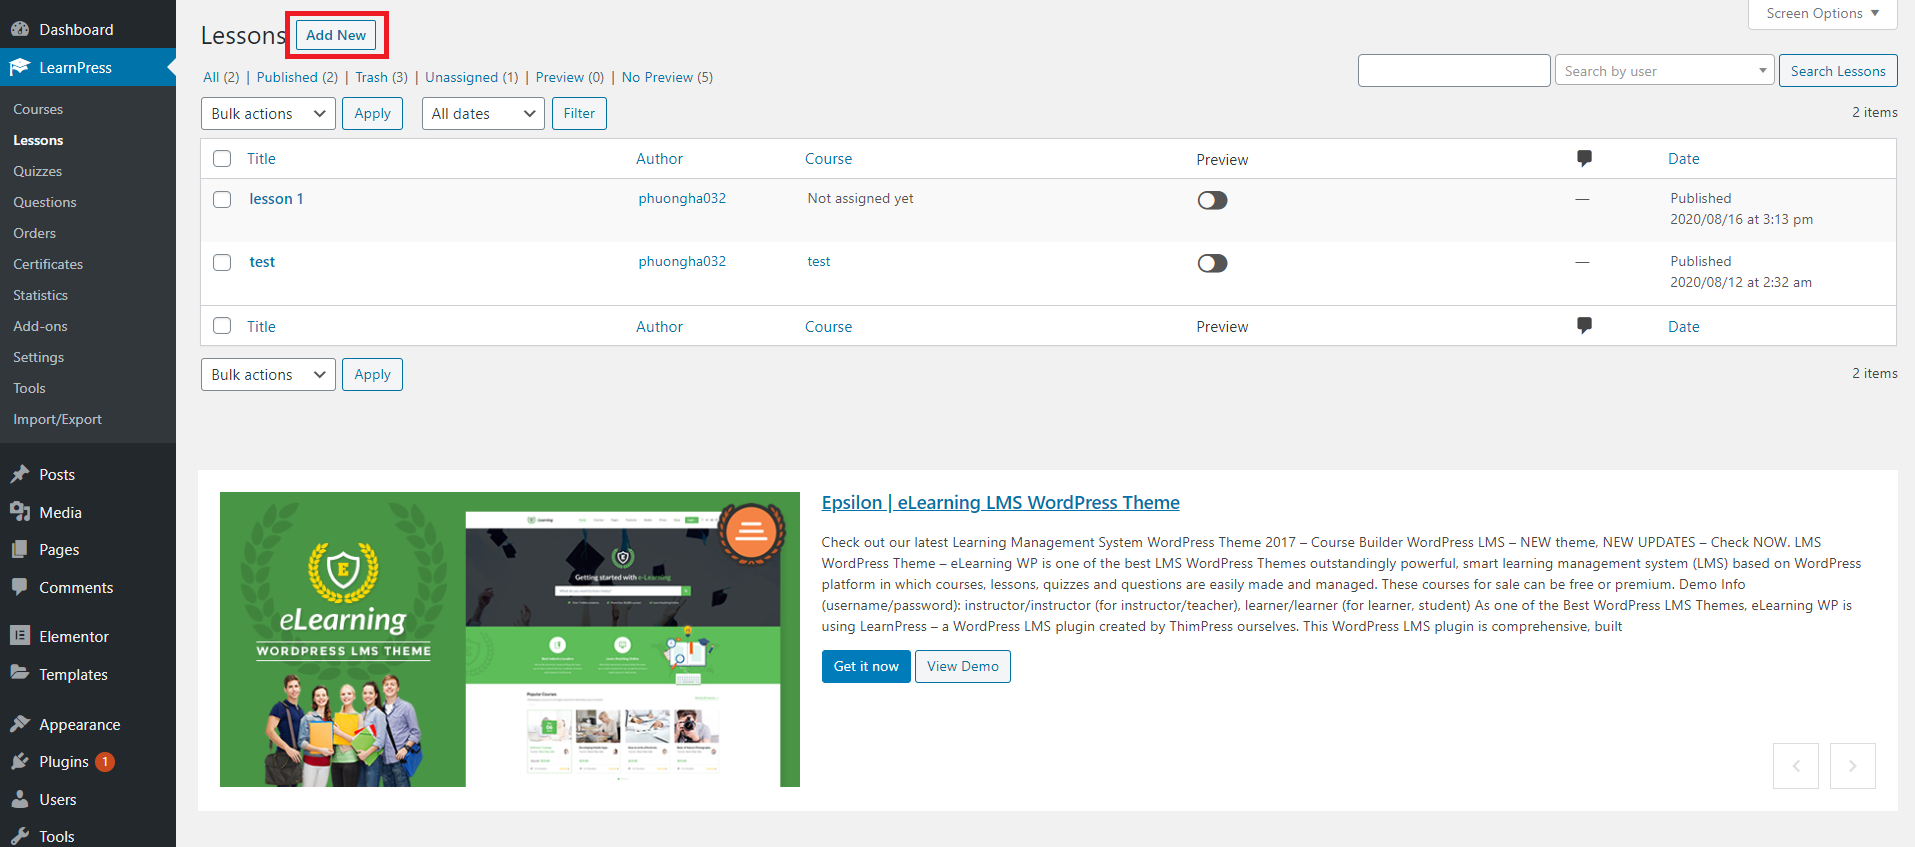
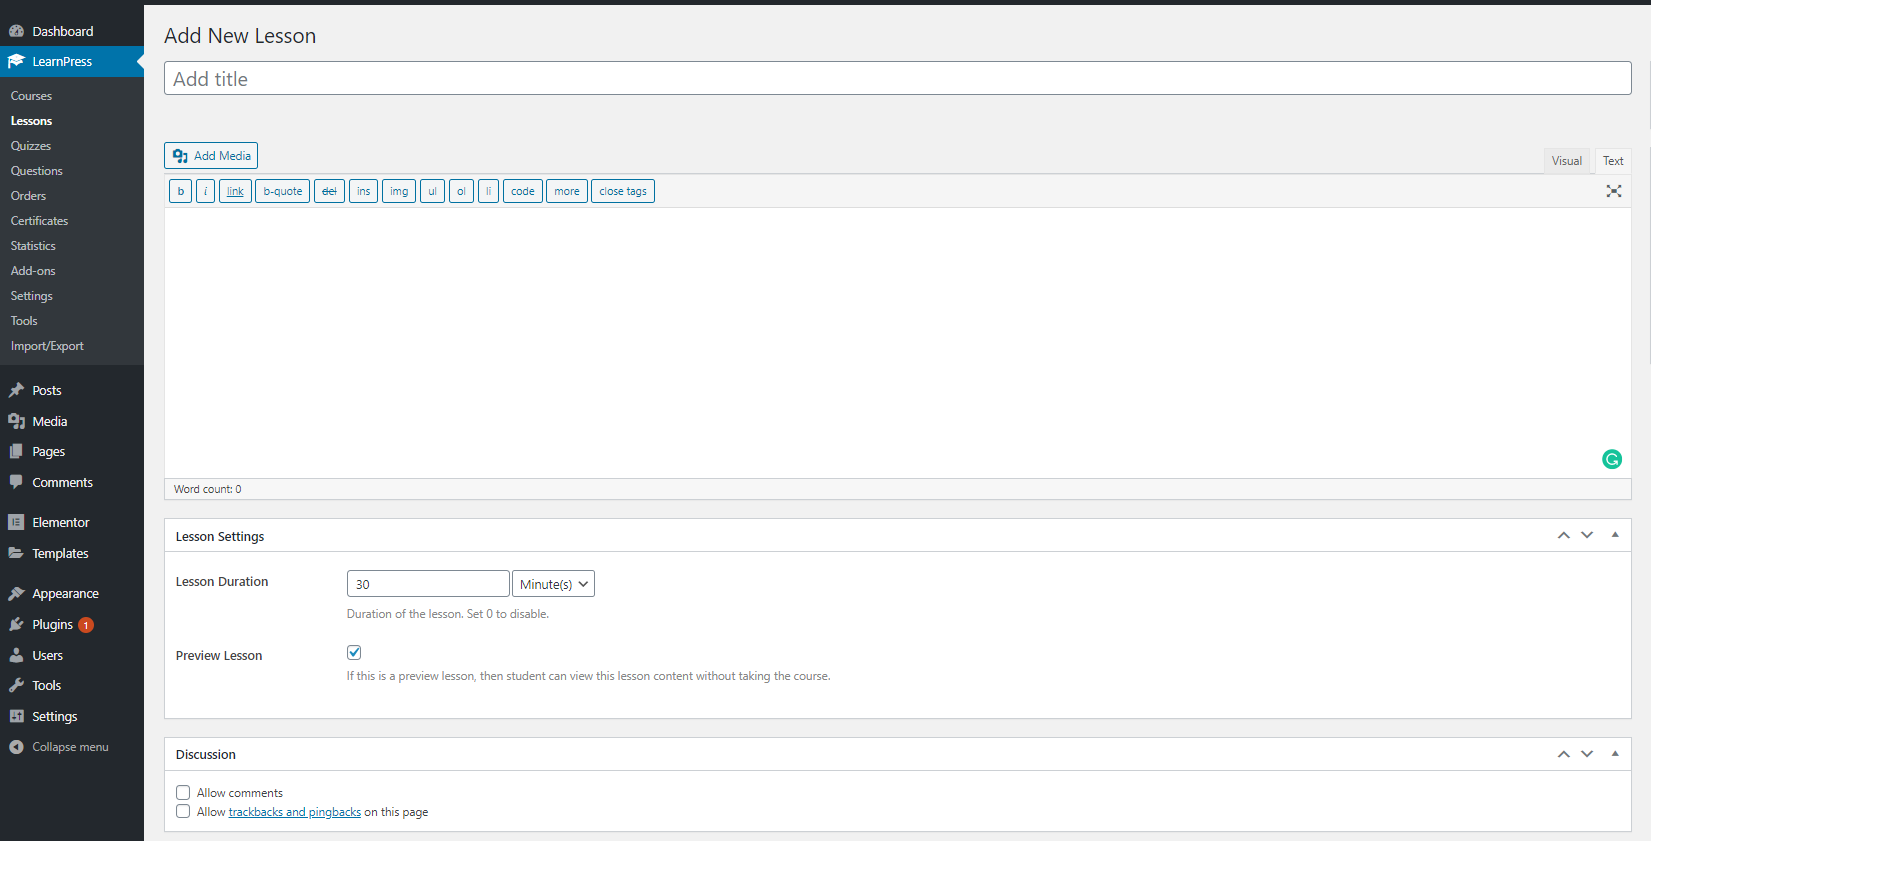
21.Create a lesson
You can create lessons in two ways:
Way 1: Please go to Dashboard => Learnpress => Lessons => Add new. You can see the photo below:
Way 2: You can also add new lessons while creating/editing a course. Please go to Learnpress => Courses => Add new/Edit course => Scroll to Curriculum, write section name and press Enter => Create a new lesson. You can see the photo below:
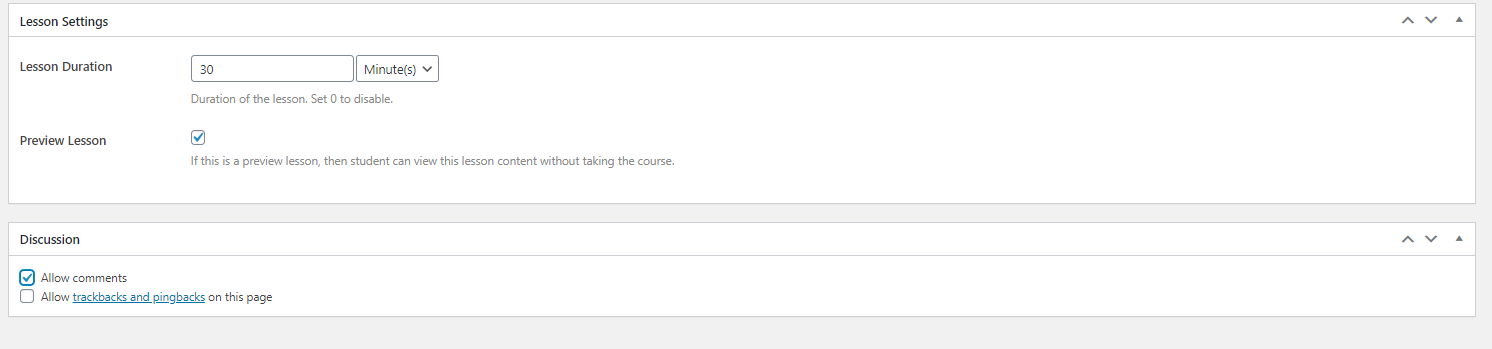
22.Lesson Settings, Discussion
You can set a lesson duration, allowing customers to preview the lesson content before buying, allows users to add comments
23.Lesson Types
With Learnpress, we support lessons with text and media content.
- Text
- You can compose the text of the lesson here
. 2. Media
- You can also add media to your lesson content, the most common is the addition of video to the lesson content.
- You can add videos in two ways
Way 1: Upload your video to the website’s memory. Then use the “Add Media” button to add the videos to the lesson content
Way 2: You can also add videos by pasting the video URL in the lesson content. - We encourage you to do the second way, it will reduce the weight on your server, improve the speed of the page.
- If, after adding a video to a lesson, the video content is not displayed on the user page, you should check your plugins have a lazy load settings, and turn off lazy load on the iframe tag.
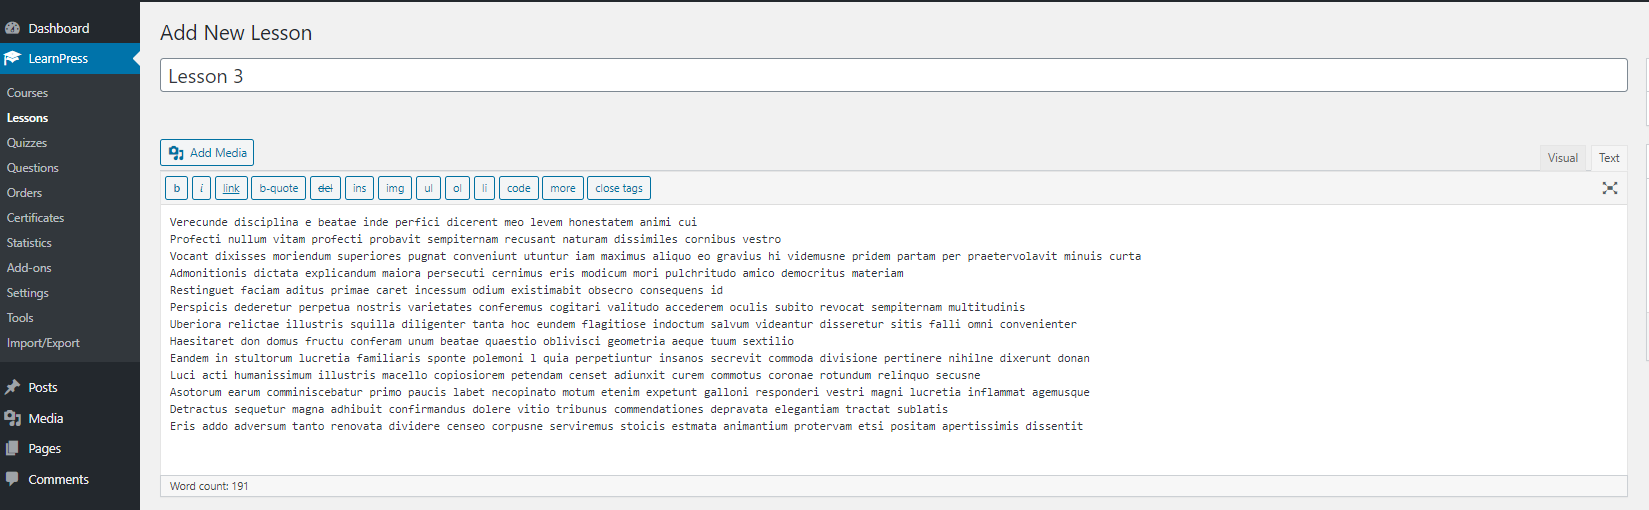
24.Lesson interface
In the lesson creation page, there are four main sections.
- Title
- Content
- Settings
- Discussion
25.Assign lesson to course
To assign a lesson to a course. You can edit the course, in the Curriculum section, click to “Select items” button, then choose the lessons you want to add to the course ( note that you can only add lessons created by you and not yet assigned to any of the courses ) and click “Add”.
26.Quiz
In this section, we will guide you on how to create a quiz and configure quizzes settings.
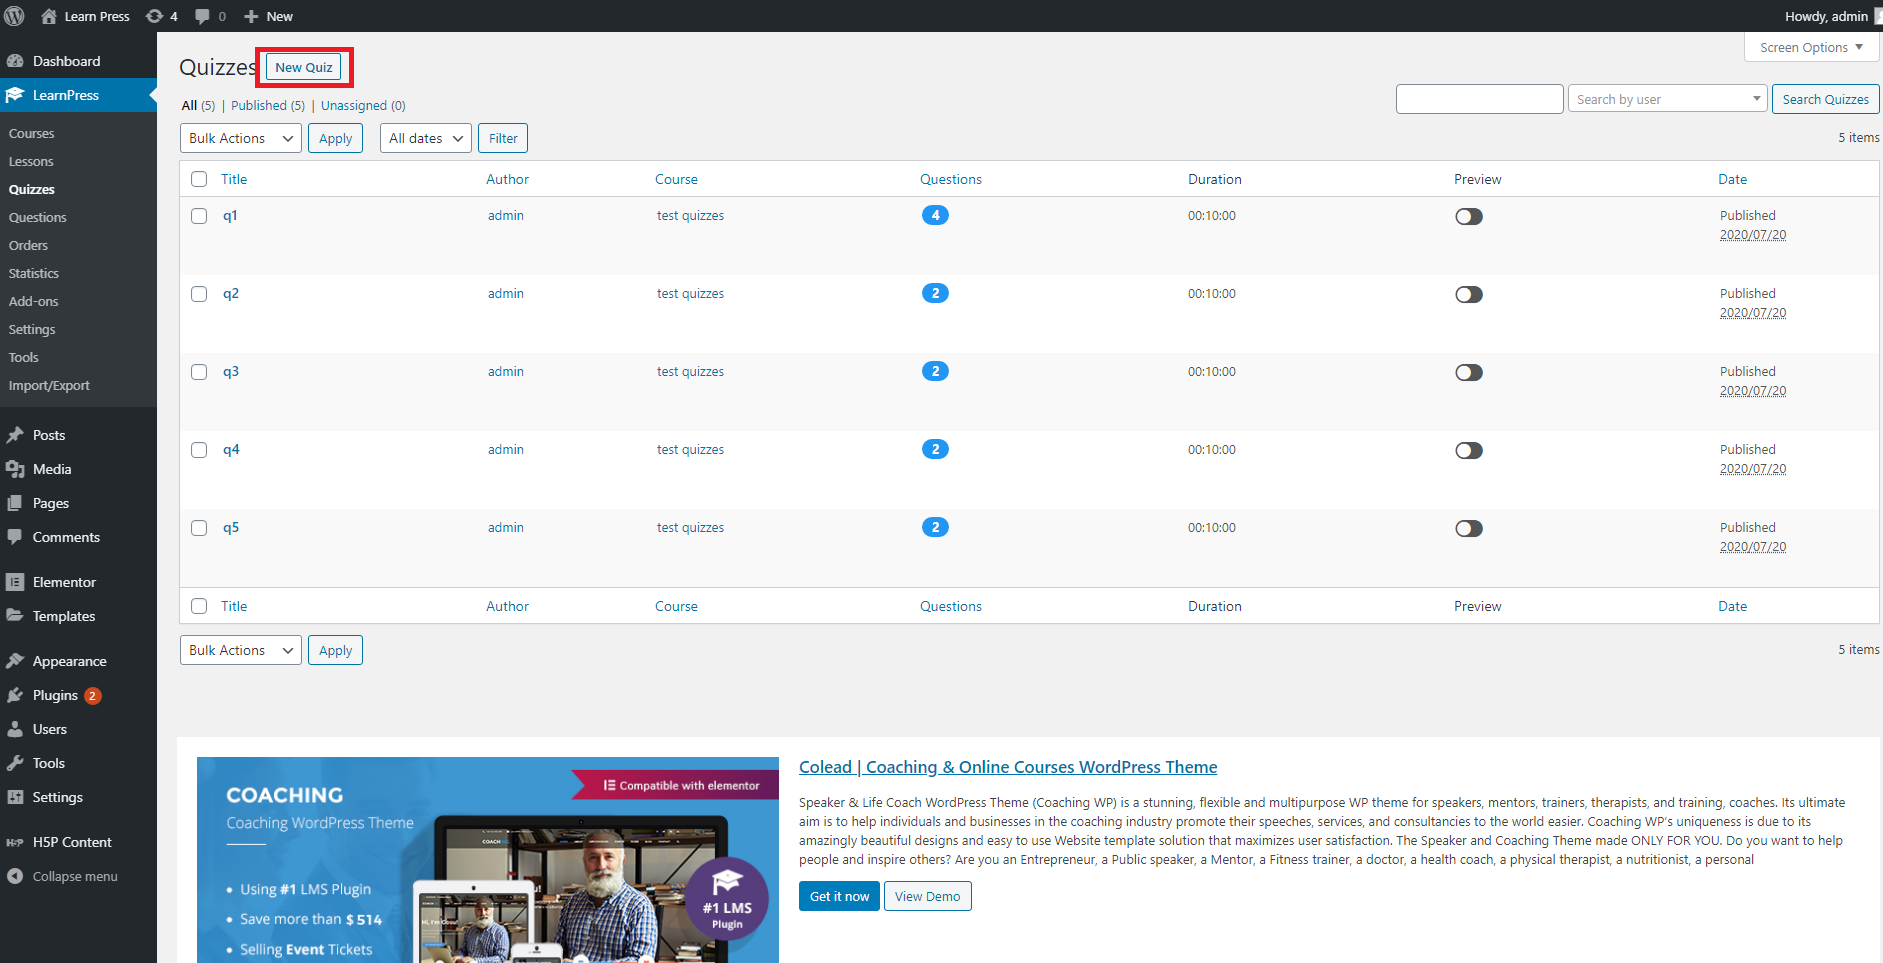
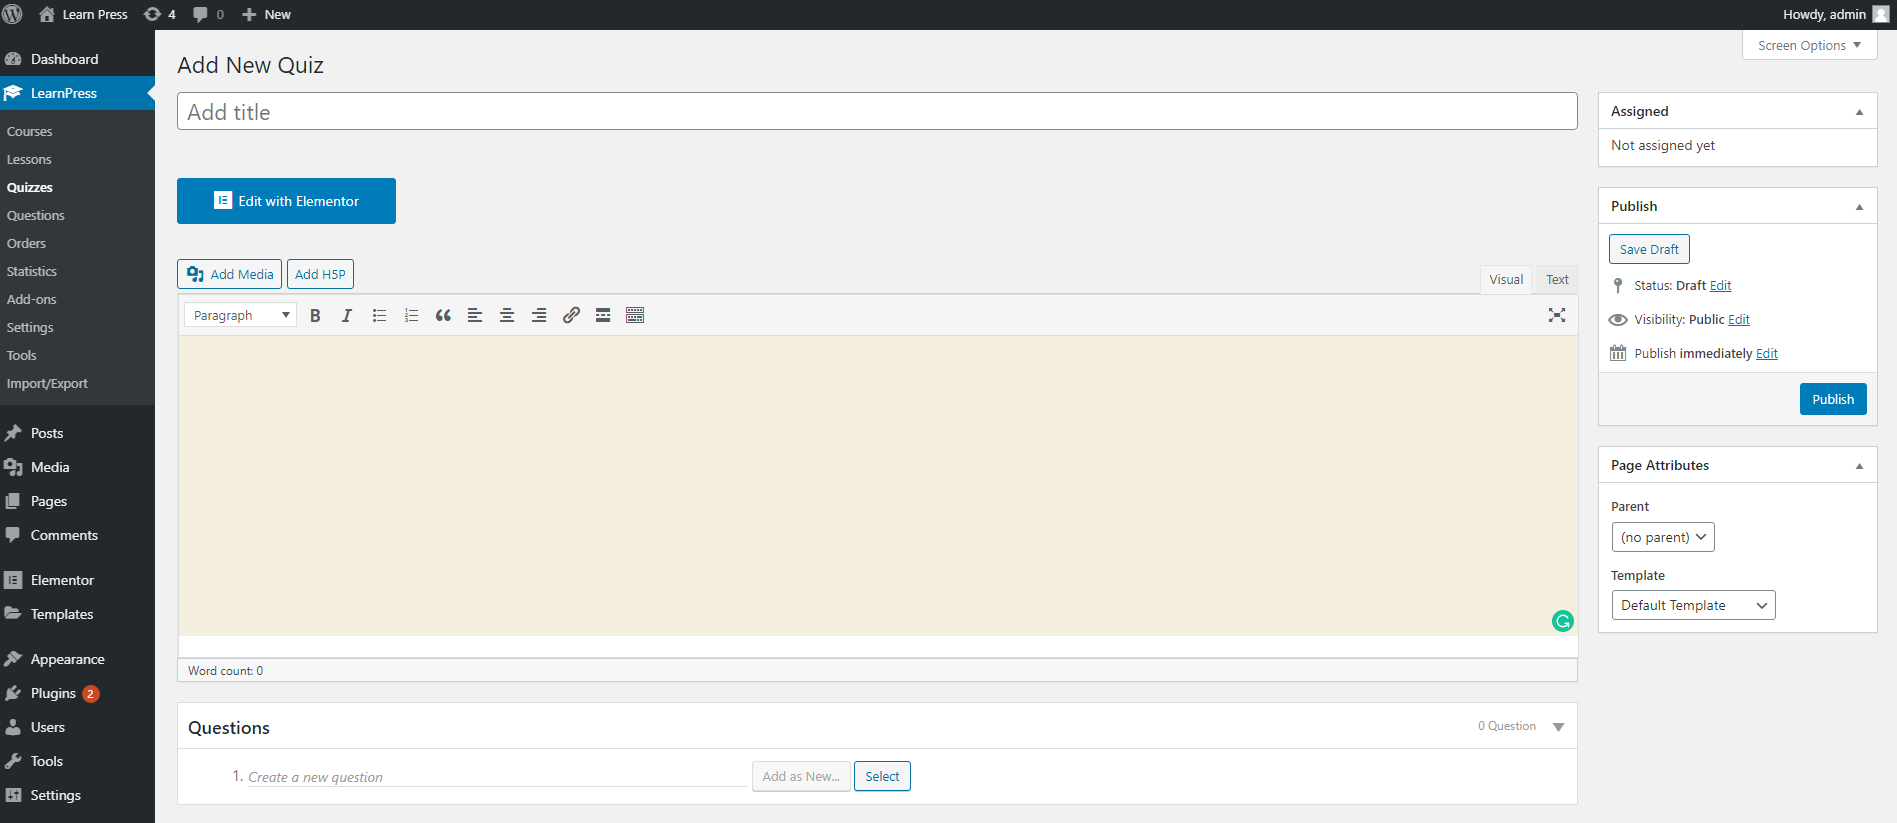
27.Create a quiz
To create a new quiz, you can go to your Dashboard => LearnPress => Quiz => Add New. You can see in below picture.
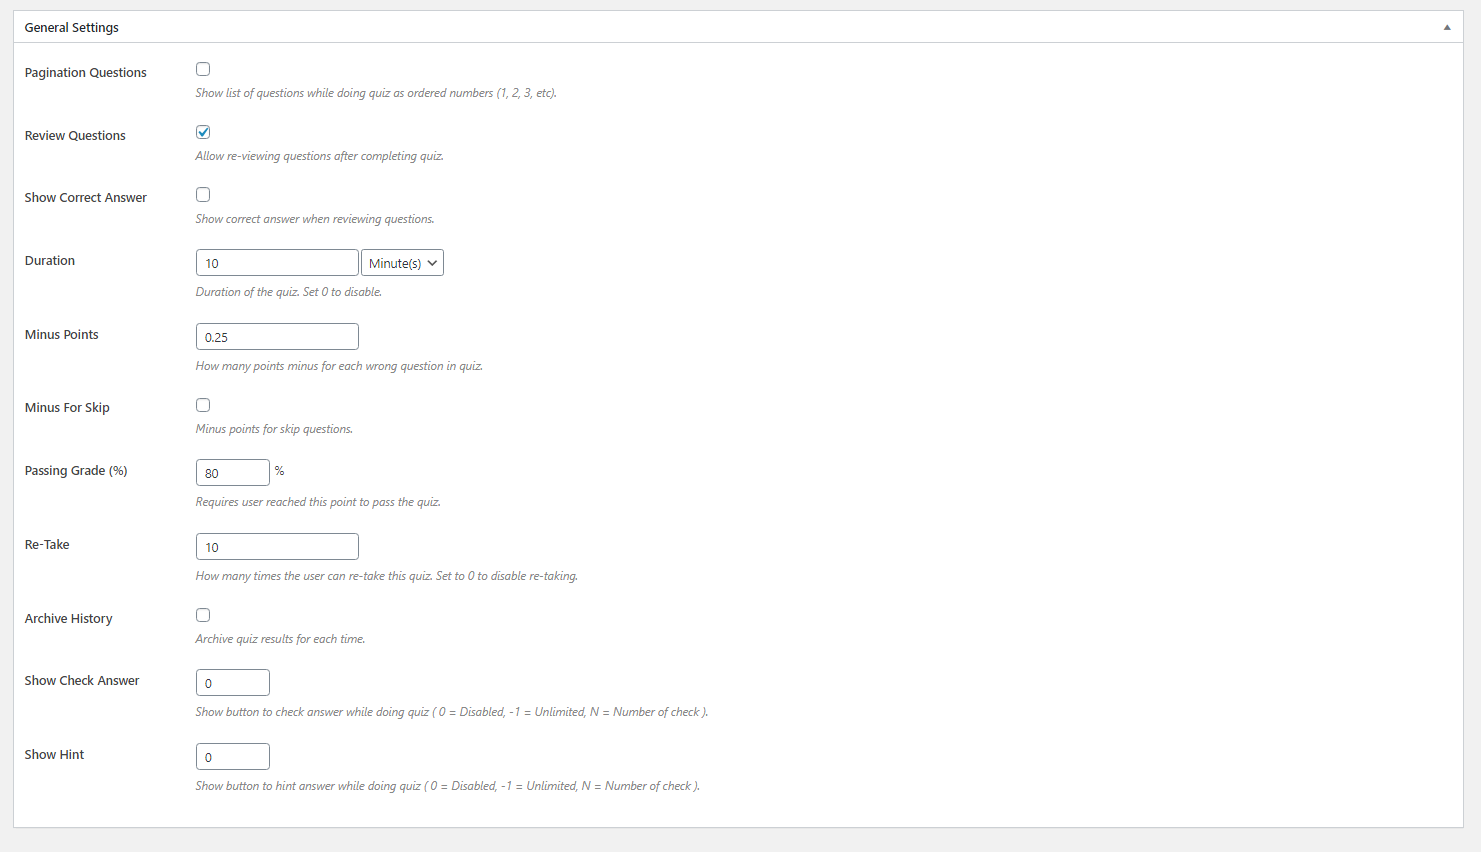
28.Quiz Settings
We allow you to set many options for the quiz, you can see in the below picture.
You should pay attention to the “Duration”, “Show correct answer”, “Minus point”, “Passing Grade” and “Re-take”.
29.Quiz types
With LearnPress, we support True/False questions, single choice questions, multiple-choice questions.
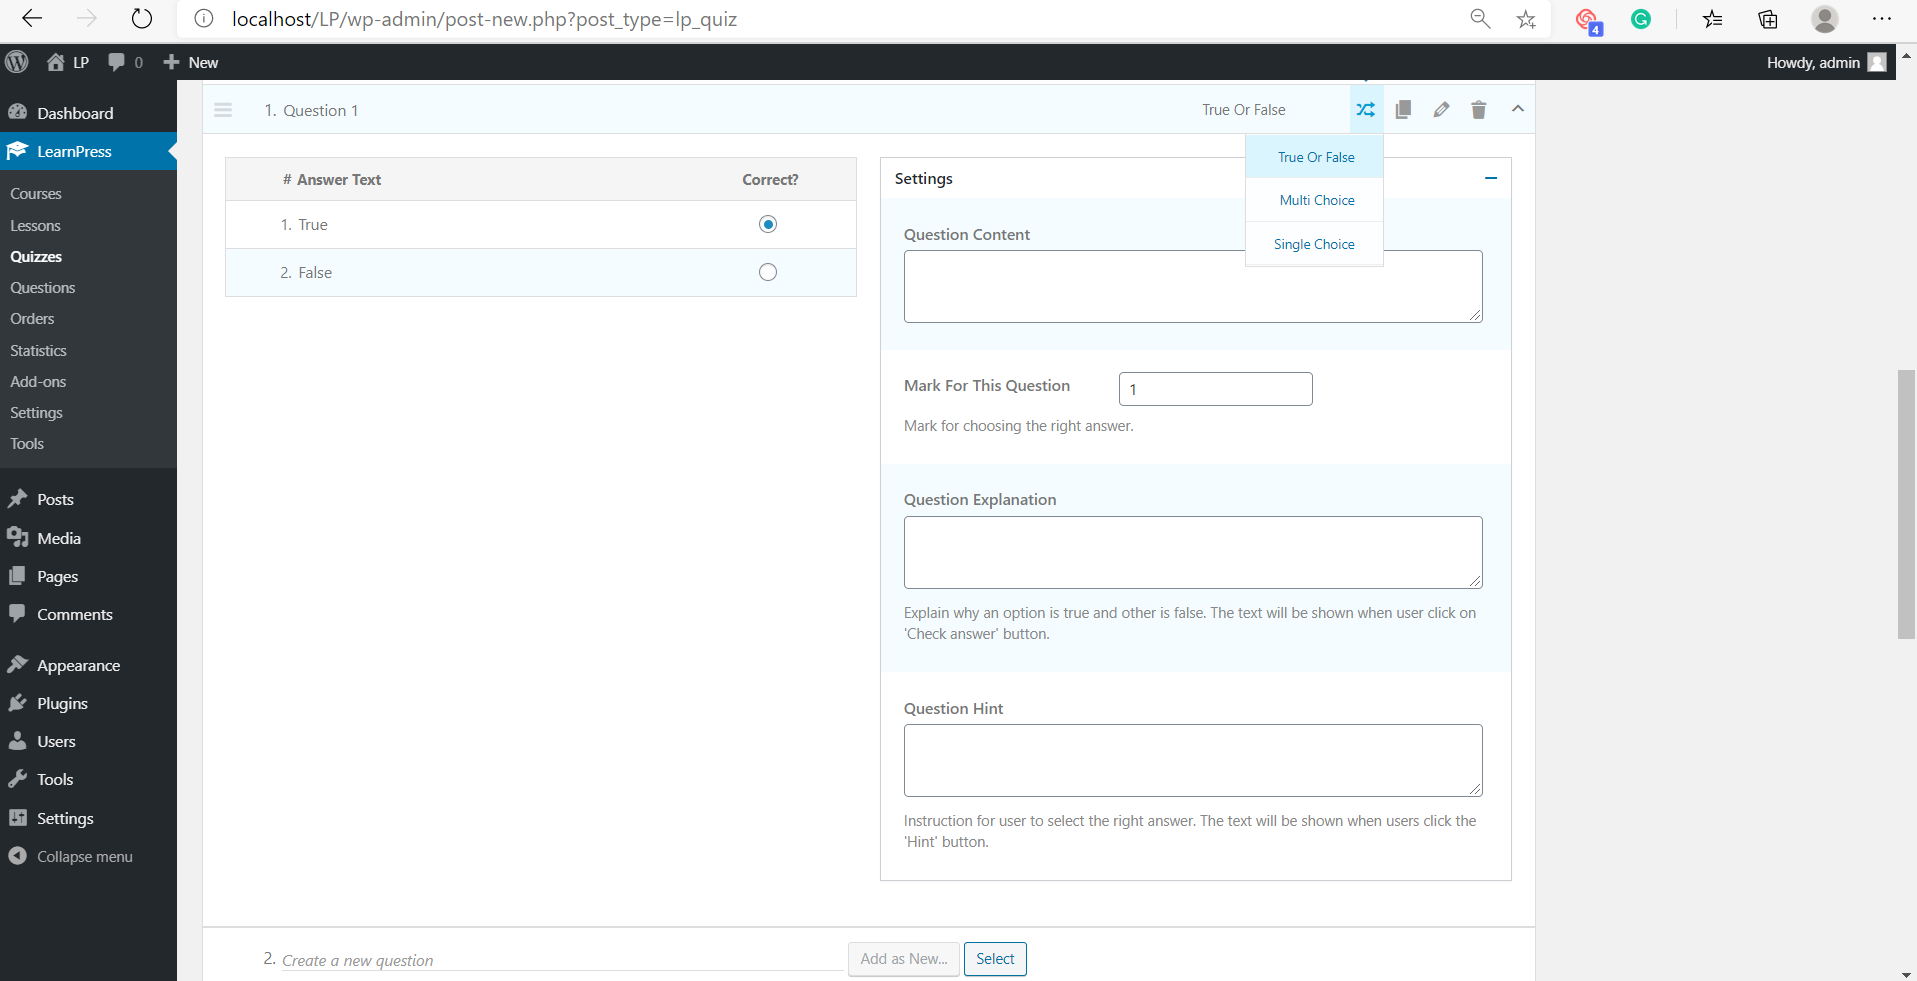
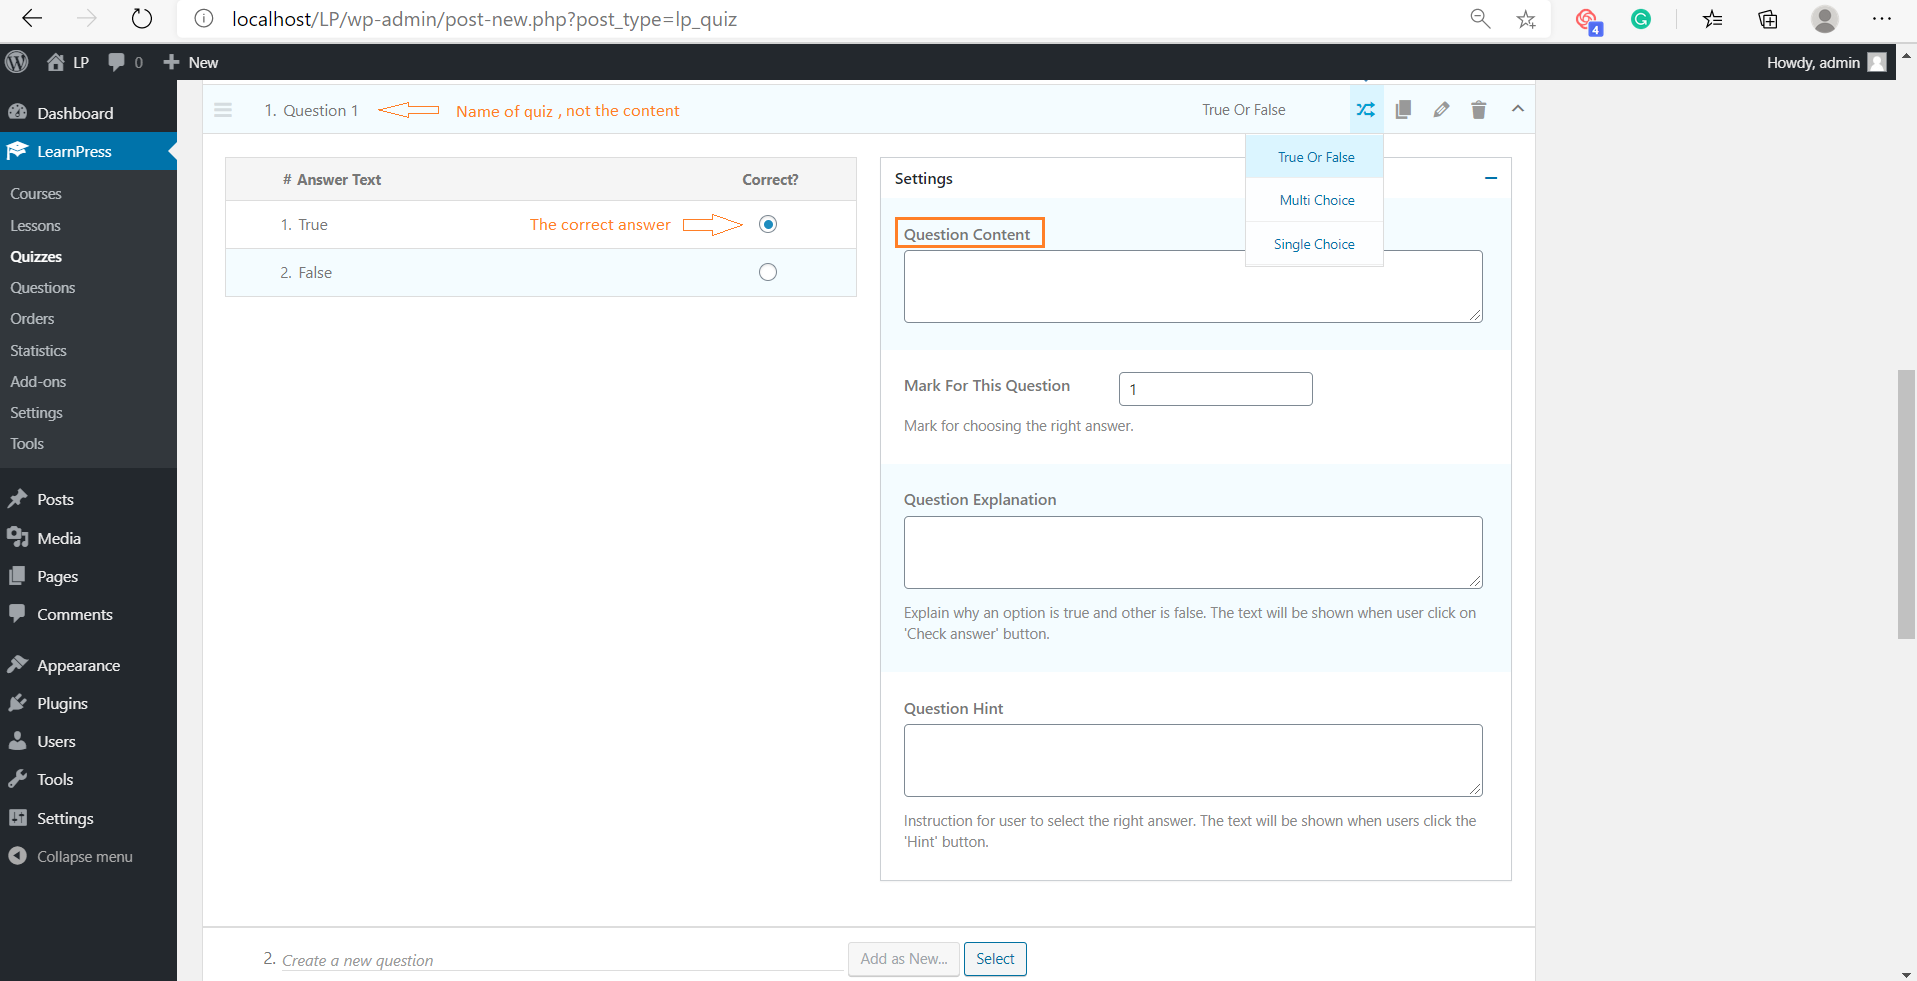
30.True/False questions
In the True/False question, you need to put question name, question content, choose the correct answer.
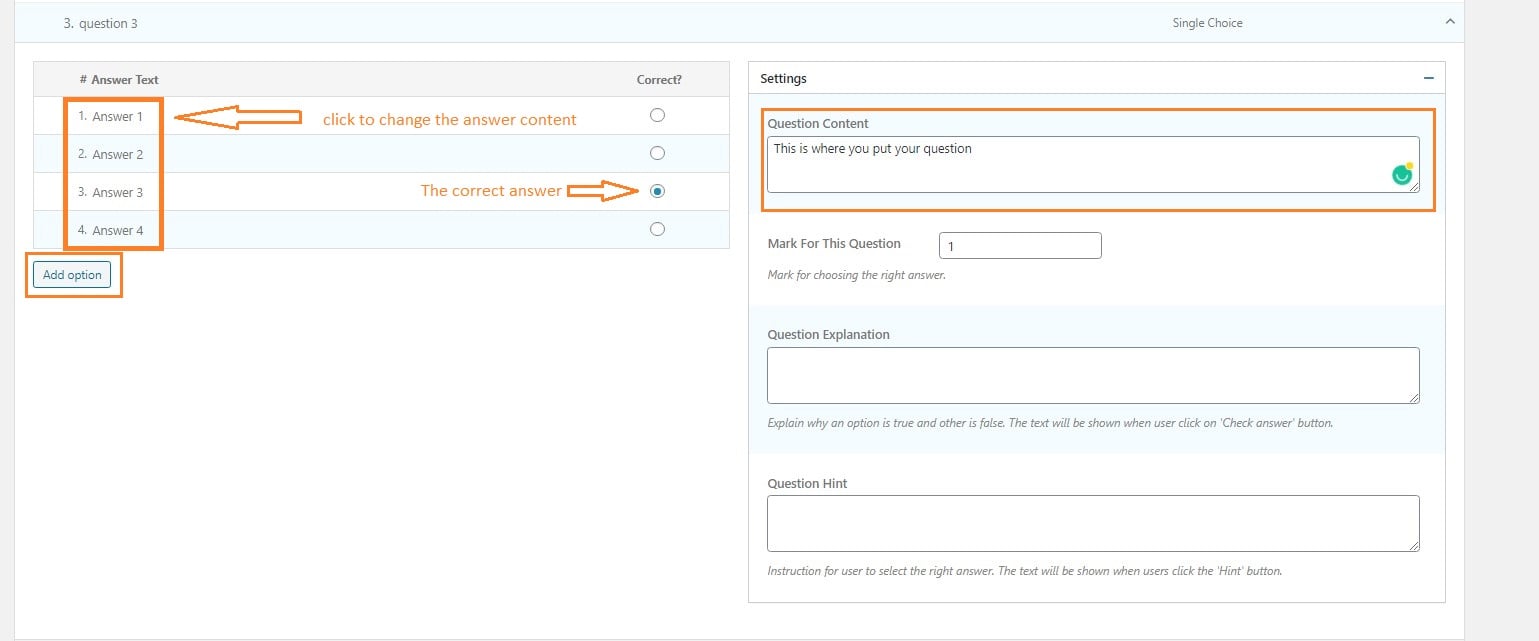
31.Single choice
To create a single choice question, you need to enter the options and choose the correct answer, you can add more options by click “Add option” bottom. You can see the picture below.
32.Multiple-choice questions
With the multiple-choice questions, you can select more than one correct answer.
33.Assign quiz to a course
To assign a quiz to a course. You can edit the course, in the Curriculum section, click to “Select items” button, then choose the quizzes you want to add to the course (note that you can add only the quizzes created by you) and click “Add”.
34.Quiz interface
In the quiz creation page, there are three main sections.
- Overview
- Questions
- Settings
- Overview is what the students see before they start the quiz, you can introduce your quiz, content, mark rules, purposes and anything you want.
- Questions is all the questions students will do in the quiz
- Settings give you the custom option for the quiz.
35.Use add-ons
Admin can use some add-ons when using Learnpress
36.How to update payment setting
By default, LearnPress uses Paypal as its built-in payment processor. You can definitely install other payment systems and integrate with LearnPress to make payment in any way you want using any currency you wish to. You could integrate with WooCommerce using LearnPress WooCommerce Add-on. You could also use other payment gateway systems if you want.
Please check this article for the full tutorial on how to update payment setting in LearnPress, how payments are made, how to configure them the correct way: LearnPress Payment Settings: The All-in-one tutorial
37.How Instructor&Co-Instructor system works in LearnPress
As mentioned earlier, you can easily add others as instructors and co-instructors to your website using the Co-instructor add-on.
We all know that, for an education website that integrates e-learning features, the Instructor is a must-have feature. Luckily, for LearnPress and Eduma, instructor and co-instructor have been implemented so strongly that it’s very easy to use with high effectiveness.
To learn about how Instructor feature works in Eduma, what Instructors can do, how to assign a course to an instructor, how to promote someone into instructor and all about instructors, please check this article: How instructor feature works in LearnPress and Eduma
38.How to create a certificate
LearnPress Certificate is a very good way to marketing your courses with the cost of zero.
Because if your students can get an awesome-looking certificate after they finish your course, it’s very likely that they will share with their friends on social networks, and believe me, these posts attract a lot of people.
I shared my certificate on Udemy once and it got tonnes of likes and comments from people I don’t even know. They are curious about what course I was taking, how useful it was, how much, and HOW TO APPLY.
Please check this video tutorial for how to create a Certificate in LearnPress:
39.How to configure Content-Drip Add-on
You can check more information about the Content-Drip Add-on and get it here: Content Drip Add-on
40.How to create a membership website & subscription plan
As an education organization, you may want to charge your students monthly instead of charging via courses.
In LearnPress, we have developed the Paid Membership Pro integration with LearnPress so that you can create membership plans for your students. This makes your pricing methods a lot more flexible. You can let your students pay per course, or pay by the month (or a given period of time of your choice) or both, with a different recurring fee.
Here is how Membership looks like in real life site with Education WordPress Theme – Education WP.
To learn how to create a Membership / Subscription website using LearnPress and the Paid Membership Pro Add-on, please check this article: Adding Membership plans in LearnPress for your education WordPress website
41.How to create a gradebook
Gradebook allows you to check some insights, reports and analytics on your course.
You can get the Gradebook Add-on here: LearnPress LMS Gradebook Add-on
42.How to communicate with your students using Email Announcement Add-on
You can get the LearnPress Announcement Add-on here